

Bu projemizde Ultrasonik Sensör ve servo sayesinde etrafı tarayacağız. Ve sensörün okuduğu değerleri processing ile işleyerek radar görüntüsü elde edeceğiz.
Malzeme Listesi
4. Arduino ile Processing Seri port üzerinden haberleştiği için,Arduino Kodunu gömdükten sonra Arduino IDE üzerinden “Serial Monitor”u açmayınız.
5. Arduino kısmını bitirdikten sonra aşağıdaki kodu Processing’e yazıp çalıştırıyoruz.
Malzeme Listesi
- HC-SR04 Ultrasonik Sensör
- Bir adet servo
- Arduino
- Arduino IDE ve Processing yüklü bir PC
- Sensör ve servo bağlantılarımızı aşağıdaki gibi yapıyoruz.
- HC-SR04 Echo Pini -> Arduino 2
- HC-SR04 Trigger Pini -> Arduino 3
- HC-SR04 Vcc -> Arduino 5v
- HC-SR04 GND -> Arduino GND
- Servo sinyal pini (Genellikle Sarı renkli kablo) -> Arduino 9
- Servo besleme pini (Genellikle kırmızı) -> Arduino 5v
- Servo toprak pini (Genellikle kahverengi) -> Arduino GND
- Bağlantılarımızı yaptıktan sonra Arduino’muzu PC’ye bağlıyoruz.
- Ve Arduino IDE kodunu gömüyoruz.
Kod:
#include <Servo.h>
Servo leftRightServo; // servoyu tanımlıyoruz
int leftRightPos = 0; // servonun başlangıç konumu
const int numReadings = 10; // okuma sayısı
int index = 0; //Anlık okunan değerlerin indeksi
int total = 0; // Toplanan okunan değerlerin indeksi
int average = 0; // Ortalama
int echoPin = 2; // sensörün echo pini
int initPin = 3; // sensörün triger pini
unsigned long pulseTime = 0; // sensör pulse süresi
unsigned long distance = 0; // mesafe değişkeni

/* pin ve port ayarları */
**** setup() {

leftRightServo.attach(9);

//sensör ayarları
pinMode(initPin, OUTPUT);
pinMode(echoPin, INPUT);

// seri port

Serial.begin(9600);

}

/* servo konum ve sensör okuma */
**** loop() {

//servo soldan sağa git

for(leftRightPos = 0; leftRightPos < 180; leftRightPos++) {

leftRightServo.write(leftRightPos);

for (index = 0; index<=numReadings;index++) {

// sensör okuma
digitalWrite(initPin,HIGH);
delayMicroseconds(1000);
digitalWrite(initPin,LOW);
delayMicroseconds(50);
// sinyali kapa
pulseTime = pulseIn(echoPin, HIGH); // sinyali hesapla
distance = pulseTime/58; // santimetreye çevir
total = total + distance; // total değişkenini güncelle
delay(10);
}
average = total/numReadings; // okunanlardan ortalama değişkenini ayarla

if (index >= numReadings) {
index = 0;
total = 0;
}
Serial.print("X"); // processingin tanıması için önce X stringini gönder
Serial.print(leftRightPos); // anlık servo açısı
Serial.print("V"); // ikinci değer için V yolla
Serial.println(average); // okunan ortalama sensör değeri
}
//servo sağdan sola git
for(leftRightPos = 180; leftRightPos > 0; leftRightPos--) {
leftRightServo.write(leftRightPos);
for (index = 0; index<=numReadings;index++) {
digitalWrite(initPin, LOW);
delayMicroseconds(50);
digitalWrite(initPin, HIGH);
delayMicroseconds(50);
digitalWrite(initPin, LOW);
pulseTime = pulseIn(echoPin, HIGH);
distance = pulseTime/58;
total = total + distance;
delay(10);
}
average = total/numReadings;

if (index >= numReadings) {
index = 0;
total = 0;
}
Serial.print("X");
Serial.print(leftRightPos);
Serial.print("V");
Serial.println(average);
}
}5. Arduino kısmını bitirdikten sonra aşağıdaki kodu Processing’e yazıp çalıştırıyoruz.
Kod:
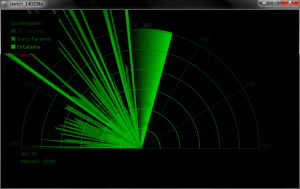
import processing.serial.*; // import serial librarySerial myPort; // declare a serial portfloat x, y; // variable to store x and y co-ordinates for verticesint radius = 350; // set the radius of objectsint w = 300; // set an arbitary width valueint degree = 0; // servo position in degreesint value = 0; // value from sensorint motion = 0; // value to store which way the servo is panningint[] newValue = new int[181]; // create an array to store each new sensor value for each servo positionint[] oldValue = new int[181]; // create an array to store the previous values.PFont myFont; // setup fonts in Processingint radarDist = 0; // set value to configure Radar distance labelsint firstRun = 0; // value to ignore triggering motion on the first 2 servo sweeps/* create background and serial buffer */**** setup(){// setup the background size, colour and font.size(750, 450);background (0); // 0 = blackmyFont = createFont("verdana", 12);textFont(myFont);// setup the serial port and buffermyPort = new Serial(this, Serial.list()[0], 9600);println(Serial.list());myPort.bufferUntil('\n');} /* draw the screen */**** draw(){fill(0); // set the following shapes to be blacknoStroke(); // set the following shapes to have no outlineellipse(radius, radius, 750, 750); // draw a circle with a width/ height = 750 with its center position (x and y) set by the radiusrectMode(CENTER); // set the following rectangle to be drawn around its centerrect(350,402,800,100); // draw rectangle (x, y, width, height)if (degree >= 179) { // if at the far right then set motion = 1/ true we're about to go right to leftmotion = 1; // this changes the animation to run right to left}if (degree <= 1) { // if servo at 0 degrees then we're about to go left to rightmotion = 0; // this sets the animation to run left to right}/* setup the radar sweep *//*We use trigonmetry to create points around a circle.So the radius plus the cosine of the servo position converted to radiansSince radians 0 start at 90 degrees we add 180 to make it start from the leftAdding +1 (i) each time through the loops to move 1 degree matching the one degree of servo movementcos is for the x left to right value and sin calculates the y valuesince its a circle we plot our lines and vertices around the start point for everything will always be the center.*/strokeWeight(7); // set the thickness of the linesif (motion == 0) { // if going left to rightfor (int i = 0; i <= 20; i++) { // draw 20 lines with fading colour each 1 degree further round than the laststroke(0, (10*i), 0); // set the stroke colour (Red, Green, Blue) base it on the the value of iline(radius, radius, radius + cos(radians(degree+(180+i)))*w, radius + sin(radians(degree+(180+i)))*w); // line(start x, start y, end x, end y)}} else { // if going right to leftfor (int i = 20; i >= 0; i--) { // draw 20 lines with fading colourstroke(0,200-(10*i), 0); // using standard RGB values, each between 0 and 255line(radius, radius, radius + cos(radians(degree+(180+i)))*w, radius + sin(radians(degree+(180+i)))*w);}}/* Setup the shapes made from the sensor values */noStroke(); // no outline/* first sweep */fill(0,50,0); // set the fill colour of the shape (Red, Green, Blue)beginShape(); // start drawing shapefor (int i = 0; i < 180; i++) { // for each degree in the arrayx = radius + cos(radians((180+i)))*((oldValue[i])); // create x coordinatey = radius + sin(radians((180+i)))*((oldValue[i])); // create y coordinatevertex(x, y); // plot vertices}endShape(); // end shape/* second sweep */fill(0,110,0);beginShape();for (int i = 0; i < 180; i++) {x = radius + cos(radians((180+i)))*(newValue[i]);y = radius + sin(radians((180+i)))*(newValue[i]);vertex(x, y);}endShape();/* average */fill(0,170,0);beginShape();for (int i = 0; i < 180; i++) {x = radius + cos(radians((180+i)))*((newValue[i]+oldValue[i])/2); // create averagey = radius + sin(radians((180+i)))*((newValue[i]+oldValue[i])/2);vertex(x, y);}endShape();/* if after first 2 sweeps, highlight motion with red circle*/if (firstRun >= 360) {stroke(150,0,0);strokeWeight(1);noFill();for (int i = 0; i < 180; i++) {if (oldValue[i] - newValue[i] > 35 || newValue[i] - oldValue[i] > 35) {x = radius + cos(radians((180+i)))*(newValue[i]);y = radius + sin(radians((180+i)))*(newValue[i]);ellipse(x, y, 10, 10);}}}/* set the radar distance rings and out put their values, 50, 100, 150 etc.. */for (int i = 0; i <=6; i++){noFill();strokeWeight(1);stroke(0, 255-(30*i), 0);ellipse(radius, radius, (100*i), (100*i));fill(0, 100, 0);noStroke();text([U][COLOR=#0066cc]Integer[/COLOR][/U].toString(radarDist+50), 380, (305-radarDist), 50, 50);radarDist+=50;}radarDist = 0;/* draw the grid lines on the radar every 30 degrees and write their values 180, 210, 240 etc.. */for (int i = 0; i <= 6; i++) {strokeWeight(1);stroke(0, 55, 0);line(radius, radius, radius + cos(radians(180+(30*i)))*w, radius + sin(radians(180+(30*i)))*w);fill(0, 55, 0);noStroke();if (180+(30*i) >= 300) {text([U][COLOR=#0066cc]Integer[/COLOR][/U].toString(180+(30*i)), (radius+10) + cos(radians(180+(30*i)))*(w+10), (radius+10) + sin(radians(180+(30*i)))*(w+10), 25,50);} else {text([U][COLOR=#0066cc]Integer[/COLOR][/U].toString(180+(30*i)), radius + cos(radians(180+(30*i)))*w, radius + sin(radians(180+(30*i)))*w, 60,40);}}/* Write information text and values. */noStroke();fill(0);rect(350,402,800,100);fill(0, 100, 0);text("Açı: "+[U][COLOR=#0066cc]Integer[/COLOR][/U].toString(degree), 100, 380, 100, 50); // use Integet.toString to convert numeric to string as text() only outputs stringstext("Mesafe: "+[U][COLOR=#0066cc]Integer[/COLOR][/U].toString(value), 100, 400, 100, 50); // text(string, x, y, width, height)fill(0);rect(70,60,150,100);fill(0, 100, 0);text("Göstergeler:", 100, 50, 150, 50);fill(0,50,0);rect(30,53,10,10);text("İlk Tarama", 115, 70, 150, 50);fill(0,110,0);rect(30,73,10,10);text("İkinci Tarama", 115, 90, 150, 50);fill(0,170,0);rect(30,93,10,10);text("Ortalama", 115, 110, 150, 50);noFill();stroke(150,0,0);strokeWeight(1);ellipse(29, 113, 10, 10);fill(150,0,0);text("Hareket", 115, 130, 150, 50);} /* get values from serial port */**** serialEvent (Serial myPort) {[U][COLOR=#0066cc]String[/COLOR][/U] xString = myPort.readStringUntil('\n'); // read the serial port until a new lineif (xString != null) { // if theres data in between the new linesxString = trim(xString); // get rid of any whitespace just in case[U][COLOR=#0066cc]String[/COLOR][/U] getX = xString.substring(1, xString.indexOf("V")); // get the value of the servo position[U][COLOR=#0066cc]String[/COLOR][/U] getV = xString.substring(xString.indexOf("V")+1, xString.length()); // get the value of the sensor reading degree = [U][COLOR=#0066cc]Integer[/COLOR][/U].parseInt(getX); // set the values to variablesvalue = [U][COLOR=#0066cc]Integer[/COLOR][/U].parseInt(getV);oldValue[degree] = newValue[degree]; // store the values in the arrays.newValue[degree] = value;/* sets a counter to allow for the first 2 sweeps of the servo */firstRun++;if (firstRun > 360) {firstRun = 360; // keep the value at 360}}}
