

Starting the Game
[FONT="]
 [/FONT][FONT="]
[FONT="]
 [/FONT]Initializing Canvas and Using PreloadJS
[FONT="]
 [/FONT][FONT="]
 [/FONT][FONT="]
[FONT="]
 [/FONT][FONT="]
 [/FONT][FONT="]
 [/FONT]A Quick Change with CSS
[FONT="]
 [/FONT][FONT="]
 [/FONT][FONT="]
 [/FONT][FONT="]
 [/FONT][FONT="]
[FONT="]
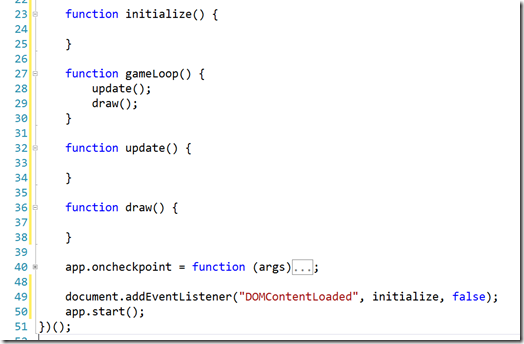
To start the game, we need to know when the page is ready to run. For that, we use the DOMContentLoaded event to tell us when the page structure has been loaded and scripts are ready to run. This is different from the onload event, which waits for all referenced content to be downloaded.[/FONT]
[FONT="]In default.js, add an initialize() function and have it called by DOMContentLoaded. While were at it, lets add the basis of the game loop as well:[/FONT]
[FONT="]
Note: the app.oncheckpoint function is collapsed to make things easier to read.[/FONT]
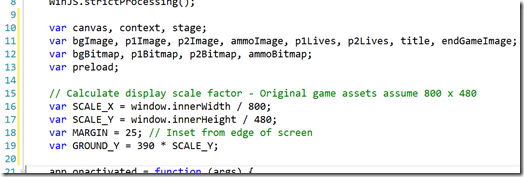
Variables[FONT="]
To work with the canvas, store images, and create bitmaps, were going to need a bunch of variables. Also, because the original game assumed a 800x480 screen, we need to scale the images we draw to the actual screen size.[/FONT]
[FONT="]Add the following variables to default.js:[/FONT]
[FONT="]
[FONT="]
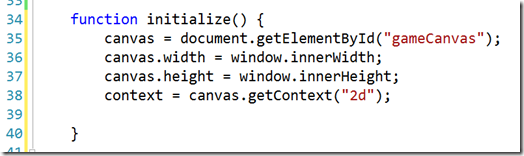
Earlier, Id mentioned canvas is only updated via JavaScript. To connect to the canvas, you need to first find the element, then retrieve its 2D context. That context exposes the drawing functions. Well also scale the canvas to match our full screen size.[/FONT]
[FONT="]Update initialize() as follows:[/FONT]
[FONT="]
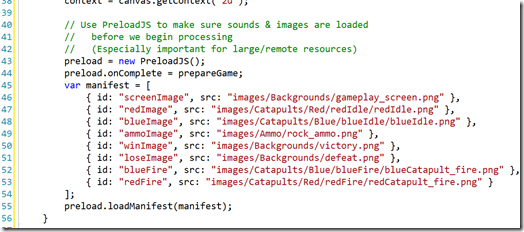
Now we need to load our images so we can draw them to the canvas. There are many ways to do this, but PreloadJS is helpful because we can list what well use and it ensures they are loaded before we reference them. If we dont do this, we may not reliably get details like image sizes at runtime, creating bugs.[/FONT]
[FONT="]PreloadJS works by reading an array of resources, then calling a function when complete. Well specify all of the images well be using.[/FONT]
[FONT="]Extend the initialize() function as follows:[/FONT]
[FONT="]
When PreloadJS has readied our assets, the prepareGame() method will be called.[/FONT]
Using EaselJS to Create and Draw Images[FONT="]
Now we need to get those images to the screen (via the canvas). Fortunately, EaselJS has a number of features well find useful:[/FONT]
[FONT="]Well get to the Ticker a bit later, but now lets add the Stage so we can start populating it with content. In default.js, add the following to the initialize() function:[/FONT]
[FONT="]
This creates the stage and connects it to our games canvas element. Now we can add items (called children) to the stage.[/FONT]
[FONT="]Right below the initialize() function, add a prepareGame() function. (Remember we told PreloadJS to call prepareGame when its done loading assets). For now, lets just add one item the background:[/FONT]
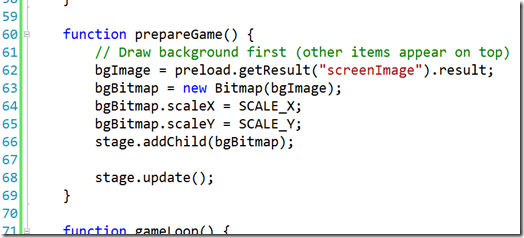
[FONT="]
Whats going on here?[/FONT]
[FONT="]- Line 62 - preload.getResult() is asking PreloadJS for the image it has already loaded for us
- Line 63 Create an EaselJS Bitmap instance, using the image as its source
- Lines 64 & 65 Scale the Bitmap to the resolution of our screen (relative to 800x480 of the original assets)
- Line 66 Add the Bitmap to the Stage as a child
- Line 68 Ask the Stage to tell the canvas about everything it knows
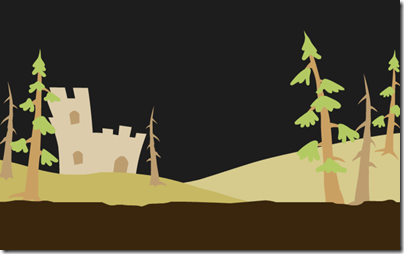
Lets run the game. After the splash screen, we now see:[/FONT]
[FONT="]
[FONT="]
As you can see, the background image we added is transparent, so our background color is showing through. The black background is spooky, but quite not what were looking for.[/FONT]
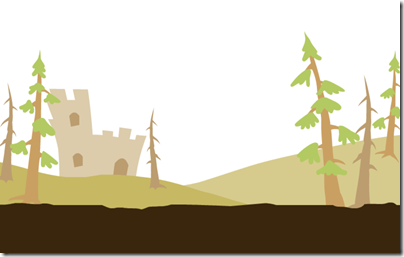
[FONT="]One thing we can do is to change which WinJS CSS base were using. By default, we use ui-dark.css, but a quick change in default.html to point to ui-light.css, and things automatically pick up new styles:[/FONT]
[FONT="]
A quick run now shows:[/FONT]
[FONT="]
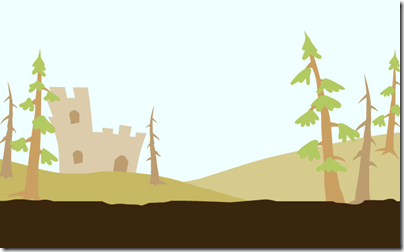
However, lets try for a more sky-like color
say, "azure". We can override the WinJS background color by setting our own via CSS. Open /css/default.css and change the body style as shown:[/FONT]
[FONT="]
Running again:[/FONT]
[FONT="]
A beautiful sky, ready for war![/FONT]

