

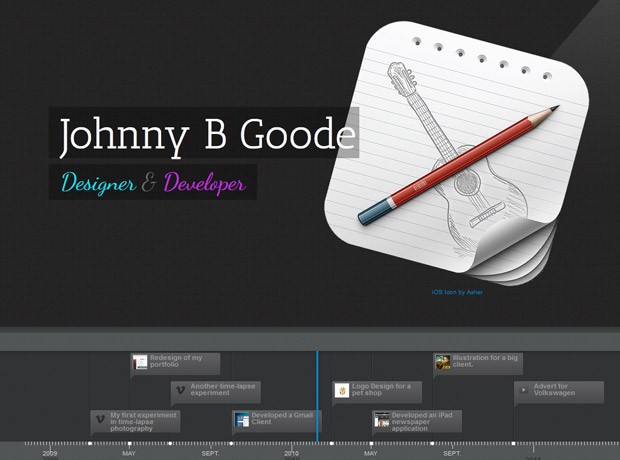
Timeline is a jQuery plugin specialized in showing a chronological series of events. You can embed all kinds of media including tweets, videos and maps, and associate them with a date. With some design tweaks, this will make it perfect for a portfolio in which you showcase your work and interests.
The HTML
Timeline comes with a light colored theme by default. It is perfectly usable and in most cases would be exactly what you need. However, for our portfolio, a dark design would be a better fit, so we will customize it to our liking.
First, let's look at the basic layout of the page:
index.html
In the head section, we have the plugin's stylesheet - timeline.css, and styles.css, which will hold our customizations. In the footer we have the jQuery library, timeline plugin and script.js which initializes it.
When we call the plugin, it will search for a div on your page with the ID of timeline. Inside it, it will inserts all the markup it needs to present the timeline:
As we will be modifying the CSS of the timeline, the fragment above will give you a better idea of the customizations. Note that we won't be recreating the plugin's stylesheet from scratch, we will only be overriding some of the rules in our own css file. This has the benefit of making future updates to the plugin straightforward, not to mention that it will be much easier.
Writing the CSS by looking at the markup alone would be a tough undertaking, given that our rules must have precedence over the ones used in timeline.css. Fortunately, there is a much easier way, as you will see in the CSS section of this tutorial.
The jQuery
To initialize the plugin, we need to call the VMM.Timeline() method on ******** ready:
The init method takes single argument - the data source. It can either be a json file like above, or a Google spreadsheet (reminiscent of our Spredsheet Powered FAQ Tutorial).
For more information on the supported data sources, see the ********ation on the plugin's site, or browse the data.json file in the zip download for this tutorial.
The CSS
I used Firebug's HTML Inspector to get the right selectors for the elements that we are about to customize. In the HTML tab, it is easy to see what rules have been applied to each element by timeline.css. To override them, I copied the same selectors to styles.css which is where our modifications will take place. On several occurrences, however, I have used the !important flag to make my work easier.
All the customizations you see below override only a handful of CSS styles. The rest are inherited by the default stylesheet. Let's begin!
The first thing we will do in styles.css, after styling the page itself, is to change the backgrounds of the timeline:

To create the 3D effect of the timeline navigation, we will need to use additional elements. But the Timeline plugin doesn't include such in its markup. An easy solution is to use :before / :after pseudo elements. The :after element is the darker top part and it uses a linear gradient to enhance the effect.
Finally, we will customize the appearance of the front page. I am using nth-child(1) to target only the first slider-item, which contains the name and description of the timeline which have been defined in the JSON data source.
The only thing left is to open up timeline.psd that is bundled with the download of the plugin, and change the color of some of the icons in photoshop. I have included the necessary files in the zip download for this tutorial. With this our timeline portfolio is complete!
Done!
You can use this portfolio to display not only your recent projects, but also interests and important moments of your career. Share your thoughts and suggestions in the comment section.
this post is quoted
The HTML
Timeline comes with a light colored theme by default. It is perfectly usable and in most cases would be exactly what you need. However, for our portfolio, a dark design would be a better fit, so we will customize it to our liking.
First, let's look at the basic layout of the page:
index.html
Kod:
<!DOCTYPE html>
<html>
    <head>
        <**** charset="utf-8" />
        <title>Timeline Portfolio | Tutorialzine Demo</title>

        <!-- The default timeline stylesheet -->
        <link rel="stylesheet" href="assets/css/timeline.css" />
        <!-- Our customizations to the theme -->
        <link rel="stylesheet" href="assets/css/styles.css" />

        <!-- Google Fonts -->
        <link rel="stylesheet" href="http://fonts.googleapis.com/css?family=Dancing+Script|Antic+Slab" />

        <!--[if lt IE 9]>
          <script src="http://html5shiv.googlecode.com/svn/trunk/html5.js"></script>
        <![endif]-->
    </head>

    <body>

        <div id="timeline">
            <!-- Timeline will generate additional markup here -->
        </div>

        <!-- JavaScript includes - jQuery, turn.js and our own script.js -->
        <script src="http://code.jquery.com/jquery-1.7.1.min.js"></script>
        <script src="assets/js/timeline-min.js"></script>
        <script src="assets/js/script.js"></script>

    </body>
</html>When we call the plugin, it will search for a div on your page with the ID of timeline. Inside it, it will inserts all the markup it needs to present the timeline:
Kod:
<div class="container main" id="timeline">
    <div class="feature slider" style="overflow-y: hidden;">
        <div class="slider-container-mask slider-container slider-item-container">

            <!-- The divs below are the events of the timeline -->

            <div class="slider-item content">
                <div class="text container">

                    <h2 class="start">Johnny B Goode</h2>
                    <p><em><span class="c1">Designer</span> & <span class=
                    "c2">Developer</span></em></p>

                </div>

                <div class="media media-wrapper media-container">
                    <!-- Images or other media go here -->
                </div>
            </div>

            <div class="slider-item content content-container">
                <div class="text container">

                    <h2 class="date">March 2009</h2>
                    <h3>My first experiment in time-lapse photography</h3>
                    <p>Nature at its finest in this video.</p>

                </div>

                <div class="media media-wrapper media-container">
                    <!-- Images or other media go here -->
                </div>
            </div>

            <!-- More items go here -->
        </div>

        <!-- Next arrow -->
        <div class="nav-next nav-container">
            <div class="icon"></div>
            <div class="date">March 2010</div>
            <div class="title">Logo Design for a pet shop</div>
        </div>

        <!-- Previous arrow -->
        <div class="nav-previous nav-container">
            <div class="icon"></div>
            <div class="date">July 2009</div>
            <div class="title">Another time-lapse experiment</div>
        </div>
    </div>

    <div class="navigation">

            <!-- The navigation items go here (the tooltips in the bottom)
                one for each of the events -->

            <div class="time">
                <!-- The timeline numbers go here -->
            </div>
        </div>

        <div class="timenav-background">
            <div class="timenav-line" style="left: 633px;"></div>

            <div class="timenav-interval-background top-highlight"></div>
        </div>

        <div class="toolbar" style="top: 27px;">
            <div class="back-home icon" title="Return to Title"></div>
            <div class="zoom-in icon" title="Expand Timeline"></div>
            <div class="zoom-out icon" data-original-title="Contract Timeline"></div>
        </div>
    </div>
</div>Writing the CSS by looking at the markup alone would be a tough undertaking, given that our rules must have precedence over the ones used in timeline.css. Fortunately, there is a much easier way, as you will see in the CSS section of this tutorial.
The jQuery
To initialize the plugin, we need to call the VMM.Timeline() method on ******** ready:
Kod:
$(function(){

    var timeline = new VMM.Timeline();
    timeline.init("data.json");

});For more information on the supported data sources, see the ********ation on the plugin's site, or browse the data.json file in the zip download for this tutorial.
The CSS
I used Firebug's HTML Inspector to get the right selectors for the elements that we are about to customize. In the HTML tab, it is easy to see what rules have been applied to each element by timeline.css. To override them, I copied the same selectors to styles.css which is where our modifications will take place. On several occurrences, however, I have used the !important flag to make my work easier.
All the customizations you see below override only a handful of CSS styles. The rest are inherited by the default stylesheet. Let's begin!
The first thing we will do in styles.css, after styling the page itself, is to change the backgrounds of the timeline:
Kod:
#timeline{
    background:none;
}

/* The individual events in the slider */
.slider .slider-container-mask .slider-container{
    background:none;
}

/* Setting a custom background image */
#timeline div.navigation{
    background: url('../img/timeline_bg.jpg') repeat;
    border-top:none;
}
To create the 3D effect of the timeline navigation, we will need to use additional elements. But the Timeline plugin doesn't include such in its markup. An easy solution is to use :before / :after pseudo elements. The :after element is the darker top part and it uses a linear gradient to enhance the effect.
Kod:
#timeline div.navigation:before{
    position:absolute;
    content:'';
    height:40px;
    width:100%;
    left:0;
    top:-40px;
    background: url('../img/timeline_bg.jpg') repeat;
}

#timeline div.navigation:after{
    position:absolute;
    content:'';
    height:10px;
    width:100%;
    left:0;
    top:-40px;
    background:repeat-x;

    background-image: linear-gradient(bottom, #434446 0%, #363839 100%);
    background-image: -o-linear-gradient(bottom, #434446 0%, #363839 100%);
    background-image: -moz-linear-gradient(bottom, #434446 0%, #363839 100%);
    background-image: -webkit-linear-gradient(bottom, #434446 0%, #363839 100%);
    background-image: -ms-linear-gradient(bottom, #434446 0%, #363839 100%);
}
Then we add a dark background to the timeline navigation (the section with the small clickable tooltips that represent the events):

#timeline div.timenav-background{
    background-color:rgba(0,0,0,0.4) !important;

}

#timeline .navigation .timenav-background .timenav-interval-background{
    background:none;
}

#timeline .top-highlight{
    background-color:transparent !important;
}
Later we style the zoom-in / zoom-out buttons and toolbar:

#timeline .toolbar{
    border:none !important;
    background-color: #202222 !important;
}

#timeline .toolbar div{
    border:none !important;
}
The numeric scale at the bottom comes next:

#timeline .navigation .timenav .time .time-interval-minor .minor{
    margin-left:-1px;
}

#timeline .navigation .timenav .time .time-interval div{
    color: #CCCCCC;
}
The previous and next arrows:

.slider .nav-previous .icon {
    background: url("timeline.png") no-repeat scroll 0 -293px transparent;
}

.slider .nav-previous,.slider .nav-next{
    font-family:'Segoe UI',sans-serif;
}

.slider .nav-next .icon {
    background: url("timeline.png") no-repeat scroll 72px -221px transparent;
    width: 70px !important;
}

.slider .nav-next:hover .icon{
    position:relative;
    right:-5px;
}

.slider .nav-previous:hover, .slider .nav-next:hover {
    color: #666;
    cursor: pointer;
}

#timeline .thumbnail {
    border: medium none;
}
The loading screen:

#timeline .feedback {
    background-color: #222222;
    box-shadow: 0 0 30px rgba(0, 0, 0, 0.2) inset;
    border:none;
}

#timeline .feedback div{
    color: #AAAAAA;
    font-size: 14px !important;
    font-weight: normal;
}
Then we move on to the slides:

#timeline .slider-item h2,
#timeline .slider-item h3{
    font-family:'Antic Slab','Segoe UI',sans-serif;
}

#timeline .slider-item h2{
    color:#fff;
}

#timeline .slider-item p{
    font-family:'Segoe UI',sans-serif;
}

#timeline .slider-item img,
#timeline .slider-item iframe{
    border:none;
}
Kod:
/* Customizing the first slide - the cover */

#timeline .slider-item:nth-child(1) h2{
    font:normal 70px/1 'Antic Slab','Segoe UI',sans-serif;
    background:rgba(0,0,0,0.3);
    white-space: nowrap;
    padding:10px 5px 5px 20px;
    position:relative;
    right:-60px;
    z-index:10;
}

#timeline .slider-item:nth-child(1) p i{
    font:normal normal 40px 'Dancing Script','Segoe UI',sans-serif;
    background:rgba(0,0,0,0.3);
    white-space: nowrap;
    padding:5px 20px;
    position:relative;
    right:-60px;
    z-index:10;
}

#timeline .slider-item:nth-child(1) p .c1{
    color:#1bdff0;
}

#timeline .slider-item:nth-child(1) p .c2{
    color:#c92fe6;
}

#timeline .slider-item:nth-child(1) .media-container {
    left: -30px;
    position: relative;
    z-index: 1;
}

#timeline .slider-item:nth-child(1) .credit{
    text-align: center;
}Done!
You can use this portfolio to display not only your recent projects, but also interests and important moments of your career. Share your thoughts and suggestions in the comment section.
this post is quoted

