

- 7 Tem 2013
- 8,187
- 633
https://www.codeproject.com/KB/HTML/xtree/xtree.zip
Introduction
There are many web based tree controls, such as dthmlxtree(published by Saint-Petersburg, Russia), xtree(published by WebFX) and Microsoft DeepTree used in msdn. These controls let web based applications as convenience as C/S applications. But these controls have limitations such as coding is complicate, hard to modify and so on. This article will introduce how to build a web based tree control step by step using xml&xslt, and how the key features works.
Features
1. web based using xml&xslt.
2. light weight, all codes less than 13k(images excluded).
3. xp explorer style operations, support keyboard navigation.
4. support IE, firefox, not tested on opera and other browsers.
5. simple data file, conveniently generated from database.
Features to be implemented
1. edit node title in place.
2. drag&drop or cut&paste (within one tree, between trees).
3. Dynamic Loading for big trees.
4. check boxes.
Using the code
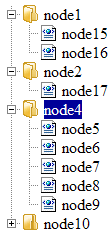
Build xml data file as following structure:
In this xml file, href="/KB/HTML/xtree/xsl" directive lead xml processor to format xml by using xtree.xsl. Be aware directory imgs is required.
Implementation Details
In xtree.xsl, there is 4 parts: main html template, tree node template, css and javascript. The core is tree node template written by XSL. This template is a recursive call procedure, just look like this:
buildNodeHTML generate such html code as following content(leaf node, no child):
HTML from above display a node status mark(plus or minus), a node icon and node tile, and connect event processor. This is a single node prototype. If this node have a child, codes as following is inserted:
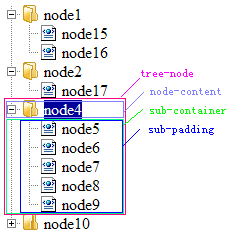
<div class=" tree-node "> is a big area to hold nodes own content and all of its children, <div class=" sub-container"> is a smaller area to hold all children, <div class=" sub- padding "> is another smaller area to hold all children which are indented from their parent.
Introduction
There are many web based tree controls, such as dthmlxtree(published by Saint-Petersburg, Russia), xtree(published by WebFX) and Microsoft DeepTree used in msdn. These controls let web based applications as convenience as C/S applications. But these controls have limitations such as coding is complicate, hard to modify and so on. This article will introduce how to build a web based tree control step by step using xml&xslt, and how the key features works.
Features
1. web based using xml&xslt.
2. light weight, all codes less than 13k(images excluded).
3. xp explorer style operations, support keyboard navigation.
4. support IE, firefox, not tested on opera and other browsers.
5. simple data file, conveniently generated from database.
Features to be implemented
1. edit node title in place.
2. drag&drop or cut&paste (within one tree, between trees).
3. Dynamic Loading for big trees.
4. check boxes.
Using the code
Build xml data file as following structure:
Kod:
<?xml version="1.0" encoding="utf-8"?>
<?xml-stylesheet type="text/xsl" href="xtree.xsl" ?>
<nodes>
<node>
<code>node1_code</code>
<parent_code>node0</parent_code>
<name>node1_name</name>
</node>
<node>
<code>node2_code</code>
<parent_code>node0</parent_code>
<name>node2_name</name>
</node>
</nodes>In this xml file, href="/KB/HTML/xtree/xsl" directive lead xml processor to format xml by using xtree.xsl. Be aware directory imgs is required.
Implementation Details
In xtree.xsl, there is 4 parts: main html template, tree node template, css and javascript. The core is tree node template written by XSL. This template is a recursive call procedure, just look like this:
Kod:
procedure formatTreeNode(xmlTreeNode) {
    foreach(childNode in xmlTreeNode.childNodes) {
        buildNodeHTML(childNode);
        //recursive call
        formatTreeNode(childNode);
}
}
Kod:
<xsl:template name="tree">
<xsl:param name="tree-node" />
<xsl:for-each select="$tree-node">
<div class="tree-node">
<div class="node-content">
<!-- node content*format*-->
...
</div>
</div>
<xsl:if test="$children>0">
<!--recursive call -->
...
</xsl:if>
</xsl:for-each>
Kod:
<div class="tree-node">
<div class="node-content">
<img class="img-line" onclick="onClick(this)" src="imgs/T.gif">
<img class="img-icon" onclick="onClick(this)" src="imgs/leaf4.gif">
<span ***********="***********(this)" onmouseout="onMouseOut(this)" onmousedown="onMouseDown(this);" onclick="onTextClick(this)"> node1</span>
</div>
</div>
buildNodeHTML generate such html code as following content(leaf node, no child):
Kod:
<div class="tree-node">
<div class="node-content">
<img class="img-line" onclick="onClick(this)" src="imgs/T.gif">
<img class="img-icon" onclick="onClick(this)" src="imgs/leaf4.gif">
<span ***********="***********(this)" onmouseout="onMouseOut(this)" onmousedown="onMouseDown(this);" onclick="onTextClick(this)"> node1</span>
</div>
</div>
HTML from above display a node status mark(plus or minus), a node icon and node tile, and connect event processor. This is a single node prototype. If this node have a child, codes as following is inserted:
Kod:
<div class="sub-container">
<div class="sub-padding">
<div class="tree-node">
</div>
</div>
</div><div class=" tree-node "> is a big area to hold nodes own content and all of its children, <div class=" sub-container"> is a smaller area to hold all children, <div class=" sub- padding "> is another smaller area to hold all children which are indented from their parent.

