

- 7 Tem 2013
- 8,188
- 637
Web Scraping with Scrapy and MongoDB
In this article were going to build a scraper for an actual freelance gig where the client wants a Python program to scrape data from Stack Overflow to grab new questions (question title and URL). Scraped data should then be stored in MongoDB. Its worth noting that Stack Overflow has an API, which can be used to access the exact same data. However, the client wanted a scraper, so a scraper is what he got.
Installation
We need the Scrapy library (v1.0.3) along with PyMongo (v3.0.3) for storing the data in MongoDB. You need to install MongoDB as well (not covered).
Scrapy
If youre running OSX or a flavor of Linux, install Scrapy with pip (with your virtualenv activated):
If you are on Windows machine, you will need to manually install a number of dependencies. Please refer to the official ********ation for detailed instructions as well as this Youtube video that I created.
Once Scrapy is setup, verify your installation by running this command in the Python shell:
If you dont get an error then you are good to go!
PyMongo
Next, install PyMongo with pip:
Now we can start building the crawler.
Scrapy Project
Lets start a new Scrapy project:
New Scrapy project 'stack' created in:
/stack-spider/stack
You can start your first spider with:
This creates a number of files and folders that includes a basic boilerplate for you to get started quickly:
├── scrapy.cfg
└── stack
├── __init__.py
├── items.py
├── pipelines.py
├── settings.py
└── spiders
└── __init__.py
Specify Data
The items.py file is used to define storage containers for the data that we plan to scrape.
The StackItem() class inherits from Item (docs), which basically has a number of pre-defined objects that Scrapy has already built for us:
Lets add some items that we actually want to collect. For each question the client needs the title and URL. So, update items.py like so:
Create the Spider
Create a file called stack_spider.py in the spiders directory. This is where the magic happens e.g., where well tell Scrapy how to find the exact data were looking for. As you can imagine, this is specific to each individual web page that you wish to scrape.
Start by defining a class that inherits from Scrapys Spider and then adding attributes as needed:
The first few variables are self-explanatory (docs):
name defines the name of the Spider.
allowed_domains contains the base-URLs for the allowed domains for the spider to crawl.
start_urls is a list of URLs for the spider to start crawling from. All subsequent URLs will start from the data that the spider downloads from the URLS in start_urls.
XPath Selectors
Next, Scrapy uses XPath selectors to extract data from a website. In other words, we can select certain parts of the HTML data based on a given XPath. As stated in Scrapys ********ation, XPath is a language for selecting nodes in XML ********s, which can also be used with HTML.
You can easily find a specific Xpath using Chromes Developer Tools. Simply inspect a specific HTML element, copy the XPath, and then tweak (as needed):
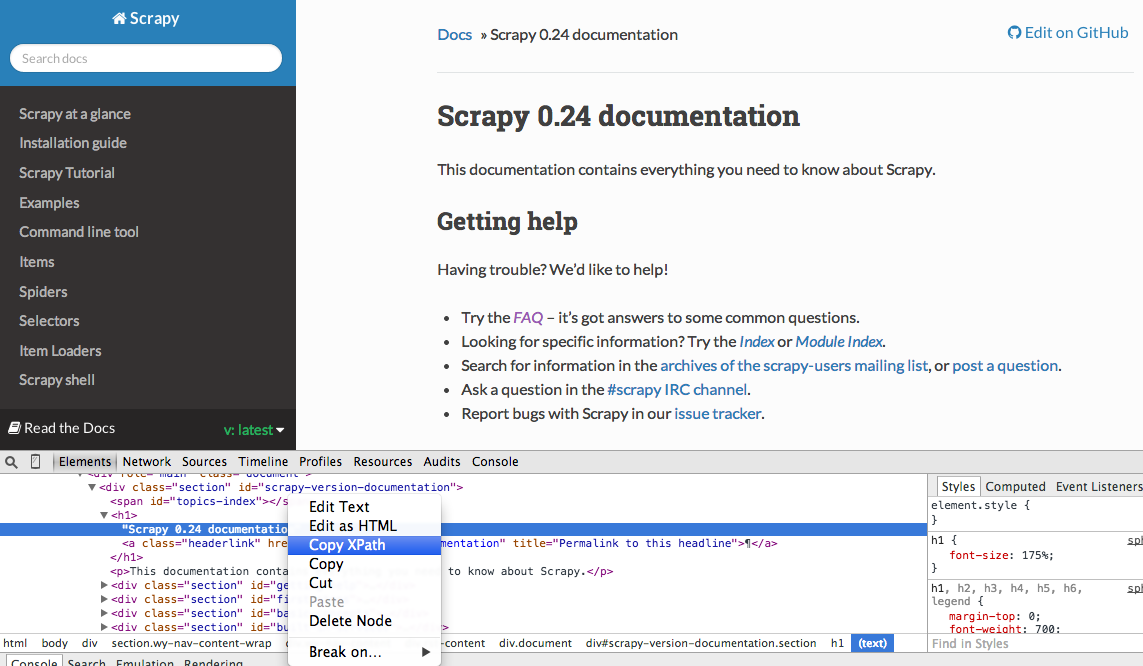
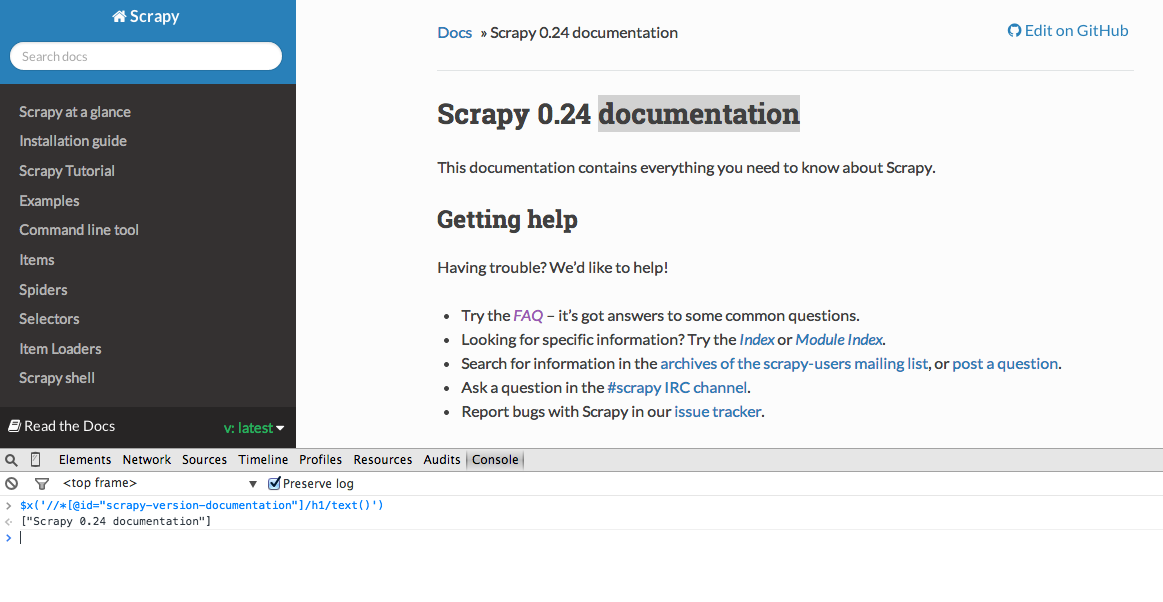
Developer Tools also gives you the ability to test XPath selectors in the JavaScript Console by using $x - i.e., $x("//img"):
Again, we basically tell Scrapy where to start looking for information based on a defined XPath. Lets navigate to the Stack Overflow site in Chrome and find the XPath selectors.
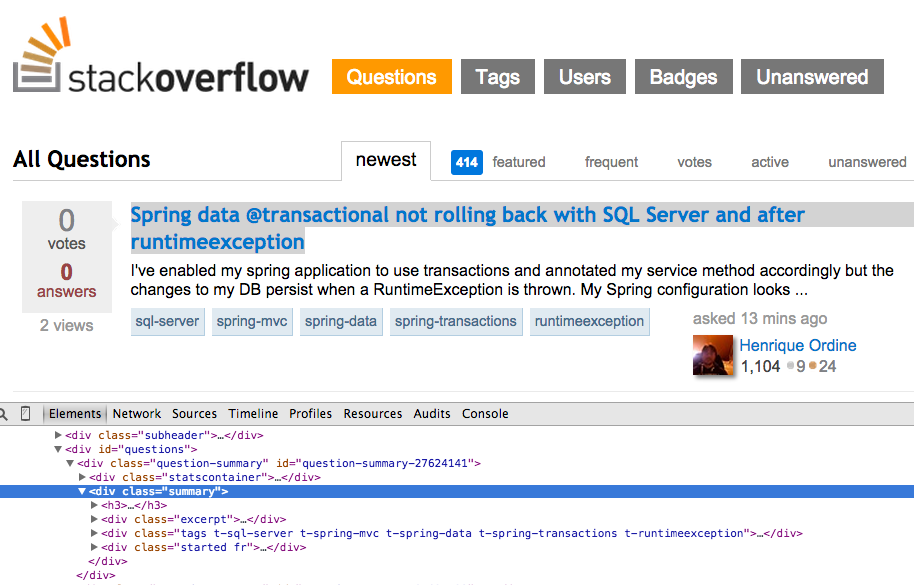
Right click on the first question and select Inspect Element:
Now grab the XPath for the <div class="summary">, //*[@id="question-summary-27624141"]/div[2], and then test it out in the JavaScript Console:
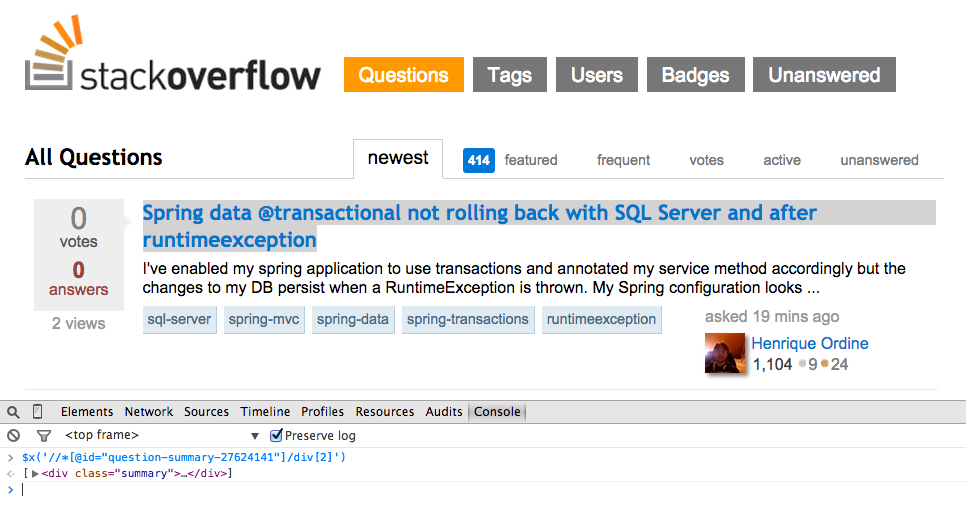
As you can tell, it just selects that one question. So we need to alter the XPath to grab all questions. Any ideas? Its simple: //div[@class="summary"]/h3. What does this mean? Essentially, this XPath states: Grab all <h3> elements that are children of a <div> that has a class of summary. Test this XPath out in the JavaScript Console.
Now lets update the stack_spider.py script:
Extract the Data
We still need to parse and scrape the data we want, which falls within <div class="summary"><h3>. Again, update stack_spider.py like so:
````
We are iterating through the `questions` and assigning the `title` and `url` values from the scraped data. Be sure to test out the XPath selectors in the JavaScript Console within Chrome Developer Tools - e.g., `$x('//div[@class="summary"]/h3/a[@class="question-hyperlink"]/text()')` and `$x('//div[@class="summary"]/h3/a[@class="question-hyperlink"]/@href')`.
## Test
Ready for the first test? Simply run the following command within the "stack" directory:
Along with the Scrapy stack trace, you should see 50 question titles and URLs outputted. You can render the output to a JSON file with this little command:
Weve now implemented our Spider based on our data that we are seeking. Now we need to store the scraped data within MongoDB.
Store the Data in MongoDB
Each time an item is returned, we want to validate the data and then add it to a Mongo collection.
The initial step is to create the database that we plan to use to save all of our crawled data. Open settings.py and specify the pipeline and add the database settings:
Pipeline Management
Weve set up our spider to crawl and parse the HTML, and weve set up our database settings. Now we have to connect the two together through a pipeline in pipelines.py.
Connect to Database
First, lets define a method to actually connect to the database:
Here, we create a class, MongoDBPipeline(), and we have a constructor function to initialize the class by defining the Mongo settings and then connecting to the database.
Process the Data
Next, we need to define a method to process the parsed data:
We establish a connection to the database, unpack the data, and then save it to the database. Now we can test again!
Test
Again, run the following command within the stack directory:
NOTE: Make sure you have the Mongo daemon - mongod - running in a different terminal window.
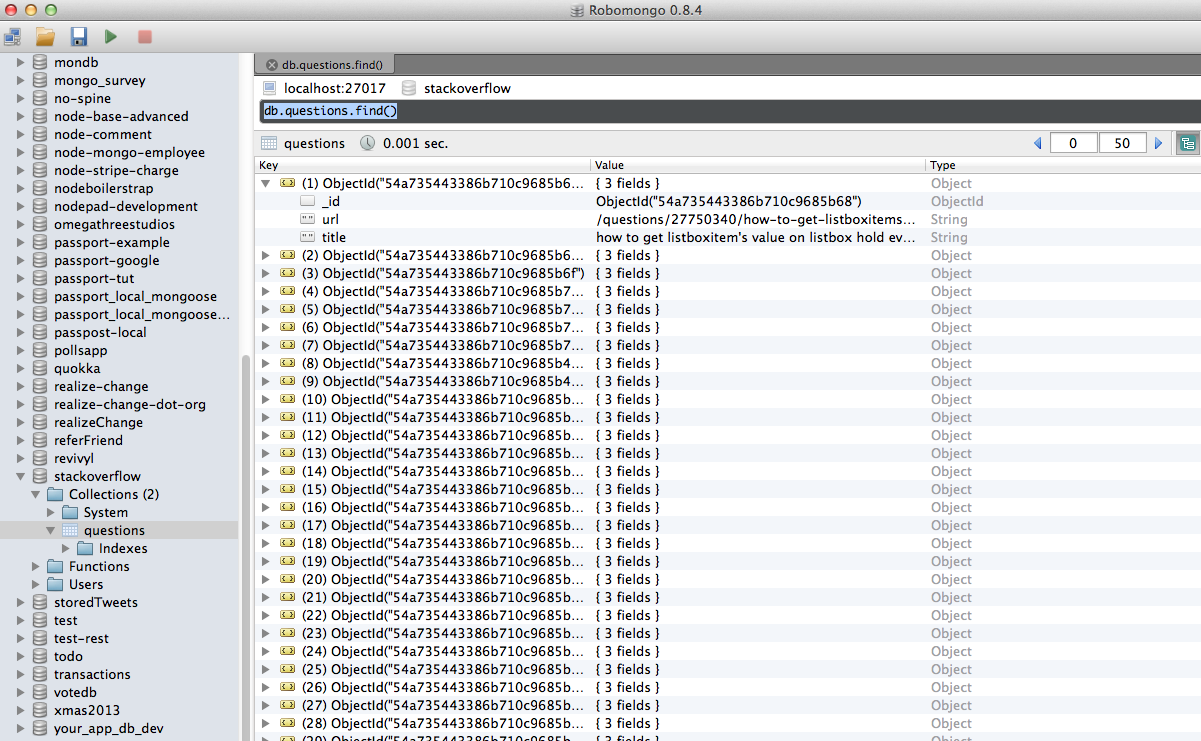
Hooray! We have successfully stored our crawled data into the database:
Conclusion
This is a pretty simple example of using Scrapy to crawl and scrape a web page. The actual freelance project required the script to follow the pagination links and scrape each page using the CrawlSpider (docs), which is super easy to implement. Try implementing this on your own, and leave a comment below with the link to the Github repository for a quick code review.
You can download the entire source code from the Github repository. Comment below with questions. Thanks for Reading!
https://github.com/realpython/stack-spider/releases/tag/v1
In this article were going to build a scraper for an actual freelance gig where the client wants a Python program to scrape data from Stack Overflow to grab new questions (question title and URL). Scraped data should then be stored in MongoDB. Its worth noting that Stack Overflow has an API, which can be used to access the exact same data. However, the client wanted a scraper, so a scraper is what he got.
Installation
We need the Scrapy library (v1.0.3) along with PyMongo (v3.0.3) for storing the data in MongoDB. You need to install MongoDB as well (not covered).
Scrapy
If youre running OSX or a flavor of Linux, install Scrapy with pip (with your virtualenv activated):
Kod:
$ pip install Scrapy==1.0.3
$ pip freeze > requirements.txtOnce Scrapy is setup, verify your installation by running this command in the Python shell:
Kod:
>>> import scrapy
>>>PyMongo
Next, install PyMongo with pip:
Kod:
$ pip install pymongo
$ pip freeze > requirements.txtScrapy Project
Lets start a new Scrapy project:
Kod:
$ scrapy startproject stack
2015-09-05 20:56:40 [scrapy] INFO: Scrapy 1.0.3 started (bot: scrapybot)
2015-09-05 20:56:40 [scrapy] INFO: Optional features available: ssl, http11
2015-09-05 20:56:40 [scrapy] INFO: Overridden settings: {}/stack-spider/stack
You can start your first spider with:
Kod:
  cd stack
scrapy genspider example example.com├── scrapy.cfg
└── stack
├── __init__.py
├── items.py
├── pipelines.py
├── settings.py
└── spiders
└── __init__.py
Specify Data
The items.py file is used to define storage containers for the data that we plan to scrape.
The StackItem() class inherits from Item (docs), which basically has a number of pre-defined objects that Scrapy has already built for us:
Kod:
import scrapy


class StackItem(scrapy.Item):
    # define the fields for your item here like:
    # name = scrapy.Field()
    pass
Kod:
from scrapy.item import Item, Field


class StackItem(Item):
    title = Field()
    url = Field()
Create a file called stack_spider.py in the spiders directory. This is where the magic happens e.g., where well tell Scrapy how to find the exact data were looking for. As you can imagine, this is specific to each individual web page that you wish to scrape.
Start by defining a class that inherits from Scrapys Spider and then adding attributes as needed:
Kod:
from scrapy import Spider


class StackSpider(Spider):
    name = "stack"
    allowed_domains = ["stackoverflow.com"]
    start_urls = [
        "http://stackoverflow.com/questions?pagesize=50&sort=newest",
]name defines the name of the Spider.
allowed_domains contains the base-URLs for the allowed domains for the spider to crawl.
start_urls is a list of URLs for the spider to start crawling from. All subsequent URLs will start from the data that the spider downloads from the URLS in start_urls.
XPath Selectors
Next, Scrapy uses XPath selectors to extract data from a website. In other words, we can select certain parts of the HTML data based on a given XPath. As stated in Scrapys ********ation, XPath is a language for selecting nodes in XML ********s, which can also be used with HTML.
You can easily find a specific Xpath using Chromes Developer Tools. Simply inspect a specific HTML element, copy the XPath, and then tweak (as needed):
Developer Tools also gives you the ability to test XPath selectors in the JavaScript Console by using $x - i.e., $x("//img"):
Again, we basically tell Scrapy where to start looking for information based on a defined XPath. Lets navigate to the Stack Overflow site in Chrome and find the XPath selectors.
Right click on the first question and select Inspect Element:
Now grab the XPath for the <div class="summary">, //*[@id="question-summary-27624141"]/div[2], and then test it out in the JavaScript Console:
As you can tell, it just selects that one question. So we need to alter the XPath to grab all questions. Any ideas? Its simple: //div[@class="summary"]/h3. What does this mean? Essentially, this XPath states: Grab all <h3> elements that are children of a <div> that has a class of summary. Test this XPath out in the JavaScript Console.
Now lets update the stack_spider.py script:
Kod:
from scrapy import Spider
from scrapy.selector import Selector


class StackSpider(Spider):
    name = "stack"
    allowed_domains = ["stackoverflow.com"]
    start_urls = [
        "http://stackoverflow.com/questions?pagesize=50&sort=newest",
    ]

    def parse(self, response):
        questions = Selector(response).xpath('//div[@class="summary"]/h3')
Extract the Data
We still need to parse and scrape the data we want, which falls within <div class="summary"><h3>. Again, update stack_spider.py like so:
Kod:
from scrapy import Spider
from scrapy.selector import Selector

from stack.items import StackItem


class StackSpider(Spider):
    name = "stack"
    allowed_domains = ["stackoverflow.com"]
    start_urls = [
        "http://stackoverflow.com/questions?pagesize=50&sort=newest",
    ]

    def parse(self, response):
        questions = Selector(response).xpath('//div[@class="summary"]/h3')

        for question in questions:
            item = StackItem()
            item['title'] = question.xpath(
                'a[@class="question-hyperlink"]/text()').extract()[0]
            item['url'] = question.xpath(
                'a[@class="question-hyperlink"]/@href').extract()[0]
yield itemWe are iterating through the `questions` and assigning the `title` and `url` values from the scraped data. Be sure to test out the XPath selectors in the JavaScript Console within Chrome Developer Tools - e.g., `$x('//div[@class="summary"]/h3/a[@class="question-hyperlink"]/text()')` and `$x('//div[@class="summary"]/h3/a[@class="question-hyperlink"]/@href')`.
## Test
Ready for the first test? Simply run the following command within the "stack" directory:
Kod:
```console
$ scrapy crawl stack
Kod:
$ scrapy crawl stack -o items.json -t jsonStore the Data in MongoDB
Each time an item is returned, we want to validate the data and then add it to a Mongo collection.
The initial step is to create the database that we plan to use to save all of our crawled data. Open settings.py and specify the pipeline and add the database settings:
Kod:
ITEM_PIPELINES = ['stack.pipelines.MongoDBPipeline', ]

MONGODB_SERVER = "localhost"
MONGODB_PORT = 27017
MONGODB_DB = "stackoverflow"
MONGODB_COLLECTION = "questions"Weve set up our spider to crawl and parse the HTML, and weve set up our database settings. Now we have to connect the two together through a pipeline in pipelines.py.
Connect to Database
First, lets define a method to actually connect to the database:
Kod:
import pymongo

from scrapy.conf import settings


class MongoDBPipeline(object):

    def __init__(self):
        connection = pymongo.MongoClient(
            settings['MONGODB_SERVER'],
            settings['MONGODB_PORT']
        )
        db = connection[settings['MONGODB_DB']]
self.collection = db[settings['MONGODB_COLLECTION']]Process the Data
Next, we need to define a method to process the parsed data:
Kod:
import pymongo

from scrapy.conf import settings
from scrapy.exceptions import DropItem
from scrapy import log


class MongoDBPipeline(object):

    def __init__(self):
        connection = pymongo.MongoClient(
            settings['MONGODB_SERVER'],
            settings['MONGODB_PORT']
        )
        db = connection[settings['MONGODB_DB']]
        self.collection = db[settings['MONGODB_COLLECTION']]

    def process_item(self, item, spider):
        valid = True
        for data in item:
            if not data:
                valid = False
                raise DropItem("Missing {0}!".format(data))
        if valid:
            self.collection.insert(dict(item))
            log.msg("Question added to MongoDB database!",
                    level=log.DEBUG, spider=spider)
return itemTest
Again, run the following command within the stack directory:
Kod:
$ scrapy crawl stackHooray! We have successfully stored our crawled data into the database:
Conclusion
This is a pretty simple example of using Scrapy to crawl and scrape a web page. The actual freelance project required the script to follow the pagination links and scrape each page using the CrawlSpider (docs), which is super easy to implement. Try implementing this on your own, and leave a comment below with the link to the Github repository for a quick code review.
You can download the entire source code from the Github repository. Comment below with questions. Thanks for Reading!
https://github.com/realpython/stack-spider/releases/tag/v1

